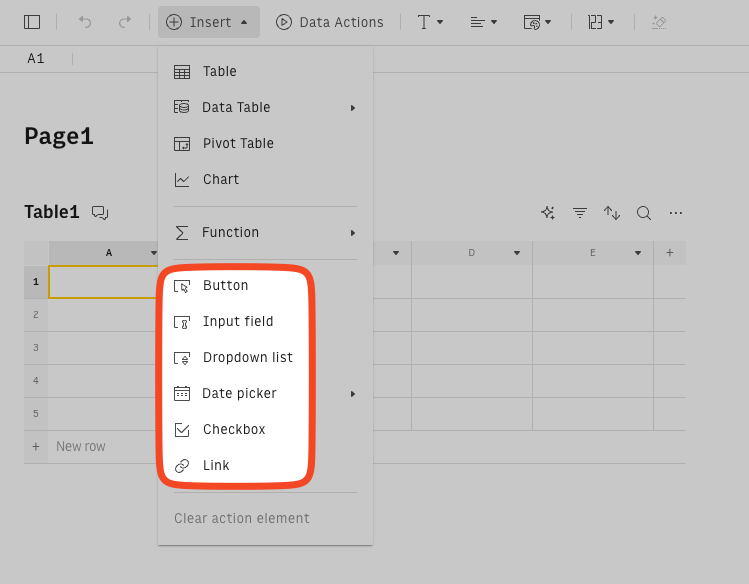
You can make your spreadsheet interactive for the user by adding action elements (form fields).
Rows supports the following field types:
- Button
- Input field
- Dropdown list
- Date Picker
- Checkbox
- Link
You’ll find all of these items in the Insert menu:
Button
Buttons allow you to execute one or more actions in your spreadsheet. To learn how to use them, let’s build an app that will generate a list of companies that attended an event.
To build this app, we will use the SEARCH_COMPANIES function and execute it when someone clicks a button on the spreadsheet.
- Create a new spreadsheet and add the headers to A1, B1 and C1 as you see below, then select cell D2.

- From the editor bar, select Insert > Button
- Enter “Find” as the label.
- Select Execute custom formula as the action.
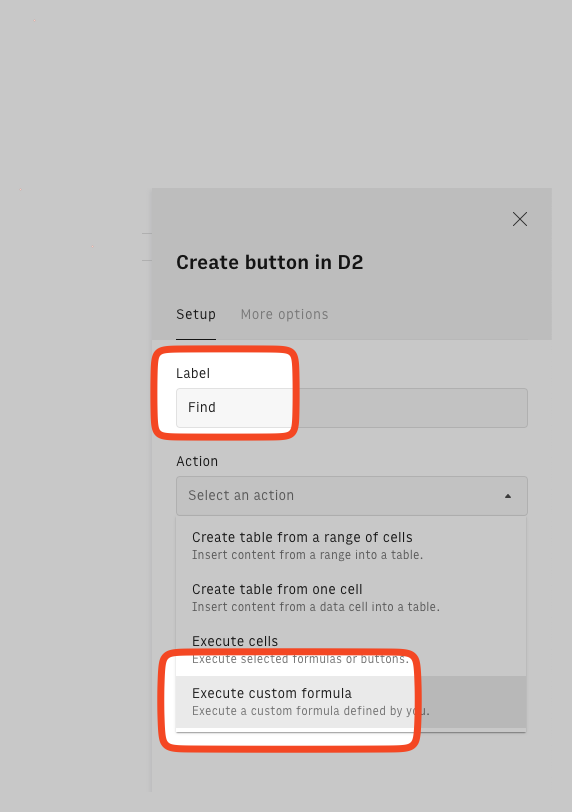
- In the Formula field, type the following:
=SEARCH_COMPANIES(A2,B2,C2) - Lastly, select or type the Result destination as E2, and click Create button. ❇️ And that's it! Let's try it out.
- In cell A2, type in >50
- In cell B2, type in Berlin
- In cell C2, type in Internet
- Click the Find button you just created. You'll see that E2 now has a
{data}cell. Perfect!
Now, if you change B2 to "Portugal", you'll see that nothing happens. That’s because the function will only execute when you click the button.
Input field
Input fields let users enter data themselves into a live spreadsheet. In our case, we want users to be able to enter a price range. To do that, all we need to do is:
- Select cells B1, and B2.

- In the editor bar, go to
 More action elements and select Input field.
 More action elements and select Input field.
✳️ Done! Now in the live spreadsheet, users will be able to enter data into your spreadsheet :).

Dropdown list
You can ensure that a cell can only have a list of predefined values by opting to choose from a list of items or list from a range of cells.
- From the editor bar, select Insert > Dropdown list
- You can either choose List of items or List from a range of cells from the Source option
- Depending on step 2, you can then choose to enter the values separated by comma or refer to a range of cells for the dropdown
Date Picker
To keep dates consistent, it helps to use a date picker instead of having people type the values in manually.
To add a date picker, follow these steps:
- Select the cell/range where you want the date picker to appear.
- In the editor bar, open the Insert
menu, hover over the Date Picker item and select Single Date or Date Range.
As you would expect, the Single Date field allows you to enter a single date into a cell.
The Date Range field inserts allows you to insert date range into a cell, in the format [yyyy-mm-dd;yyyy-mm-dd;]


What can you do with a date range cell you ask? Great question!
There are several functions that accept a date range as one of their parameters such as the CUSTOM_ANALYTICS_GOOGLE function.

If you want to make the date range parameter depend on another cell, it’s important that the range in the reference cell has the required format (‘[yyyy-mm-dd;yyyy-mm-dd]’).
That’s why it’s handy to put a date range picker in the reference cell. It removes the risk that a typo breaks any formulas that expect this format.
Checkbox
To add a checkbox:
- Select the cell/range where you want the button to appear.
- In the editor bar, open the Insert
menu and select Checkbox.
A checkbox can have two “states”:
FALSE(not checked)TRUE(checked)
So, just like with buttons, you can use checkboxes in conditional functions to trigger some kind of action.
You can also disable your checkboexes by manually adding the states as part of a formula — ex: =FALSE

Link
- From the editor bar, select Insert > Link
- Fill the Text field with the data that you'd want the cell to display
- Enter the URL in the Link field to which you'd want the user to be directed to when clicked