Using the Rows integration with Make, you open yourself up to the oppurtunity of connecting Rows to thousands of other applications and services. Check out the list here on Make. The integration itself will allow you to do 9 different actions.
Get workspace information
👉 Lists details of the Workspace associated to the API Key used.
| Field | Description |
|---|---|
| Connection | Establish a connection to your Rows account |
List folders
👉 Lists folders of a workspace.
| Field | Description |
|---|---|
| Connection | Establish a connection to your Rows account |
| Limit | The maximum number of records Make will return during one execution cycle. |
List spreadsheets
👉 Lists spreadsheets of a workspace ordered by the descending last modified date.
| Field | Description |
|---|---|
| Connection | Establish a connection to your Rows account |
| Limit | The maximum number of records Make will return during one execution cycle. |
| Folder | Select the folder name from the dropdown list. Alternatively you can use the "Map" function to use the Folder's ID instead. (Which you can get in the response to the "Lists folders of a workspace" task.) |
Get spreadsheet information
👉 Lists the details of a spreadsheet.
| Field | Description |
|---|---|
| Connection | Establish a connection to your Rows account |
| Spreadsheet | Select the spreadsheet from the dropdown that you want to get the details of. Alternatively you can use the "Map" function to use the Spreadsheet's ID instead. (Which you can get in the response to the "List spreadsheets" task.)* |
Add a Row
👉 Adds a new row to a table within a spreadsheet.
| Field | Description |
|---|---|
| Connection | Establish a connection to your Rows account |
| Spreadsheet | Select the spreadsheet from the dropdown that you want to get the details of. Alternatively you can use the "Map" function to use the Spreadsheet's ID instead. (Which you can get in the response to the "List spreadsheets" task.)* |
| Table | Select the table from the dropdown menu that you want want to use |
| Table contains headers | If you have selected Yes for headers, you will have an input to select which data to add to each column, that will show the relevant header next to it, "Column Name (A)". If you have selected No for headers, you will be given the option to provide the range of the columns to be used for adding the new data. You can select this from the dropdown menu. (we strongly advise to always use headers). |
| Values | Add the data for each column manually or programmatically |
Update a Row
👉 Updates a row in a table within a spreadsheet.
| Field | Description |
|---|---|
| Connection | Establish a connection to your Rows account |
| Spreadsheet | Select the spreadsheet from the dropdown that you want to get the details of. Alternatively you can use the "Map" function to use the Spreadsheet's ID instead. (Which you can get in the response to the "List spreadsheets" task.)* |
| Table | Select the table from the dropdown menu that you want want to use |
| Row number | Add the row number that you want to update, this can be added manually, for example "4" would update the 4th Row in the table you have selected above |
| Table contains headers | If you have selected Yes for headers, you will have an input to select which data to add to each column, that will show the relevant header next to it, "Column Name (A)". If you have selected No for headers, you will be given the option to provide the range of the columns to be used for adding the new data. You can select this from the dropdown menu. (we strongly advise to always use headers). |
| Values | Add the data for each column manually or programmatically |
Search Rows
👉 Let's you search for specific data using Make's in-built filter system.
| Field | Description |
|---|---|
| Connection | Establish a connection to your Rows account |
| Spreadsheet | Select the spreadsheet from the dropdown that you want to get the details of. Alternatively you can use the "Map" function to use the Spreadsheet's ID instead. (Which you can get in the response to the "List spreadsheets" task.)* |
| Table | Select the table from the dropdown menu that you want want to use |
| Table contains headers | If you have selected Yes for headers, you will have an input to select which data to add to each column, that will show the relevant header next to it, "Column Name (A)". If you have selected No for headers, you will be given the option to provide the range of the columns to be used for adding the new data. You can select this from the dropdown menu. (we strongly advise to always use headers). |
| Filter | Make's in-built filtering system. Where you first select the column you want to apply the filter to, then select a conditional operator, such as equals to, then finally select the value for the condition to be met. For example, you could get all rows of data where the value is equal to "12" in column A. |
Get values from a range
👉 Let's you get the values from a range, for example A2:D12.
| Field | Description |
|---|---|
| Connection | Establish a connection to your Rows account |
| Spreadsheet | Select the spreadsheet from the dropdown that you want to get the details of. Alternatively you can use the "Map" function to use the Spreadsheet's ID instead. (Which you can get in the response to the "List spreadsheets" task.)* |
| Table | Select the table from the dropdown menu that you want want to use |
| Range | Manually input the range, I.E A2:D12 or you can map this value to pre-existing data in your scenario. |
| Value render option | Select how you want the values rendered using the dropdown menu, either formatted or raw. |
| Major dimension | Select the dimension you want the data to be received in, you can choose between Row, or Column. |
Make an authenticated API call
👉 Allows you to perform any authenticated API call from the Rows API directly. You can read our documentation here
Setting up Make
Make is a visual automation platform, that lets you design, build, and automate anything–from simple tasks to complex workflows—in minutes. It’s fast and easy to use, visually intuitive, and requires zero coding expertise.
Learn more about API connectors in this article here.
To learn more about how you can set up Rows as a trigger via webhooks, please read this article.
To connect to Rows, you'll need an API Key, to create one follow the steps here. Optionally, if you want to learn everything about the Rows API, follow this link.
First, lets outline some rules to ensure everything runs smoothly!
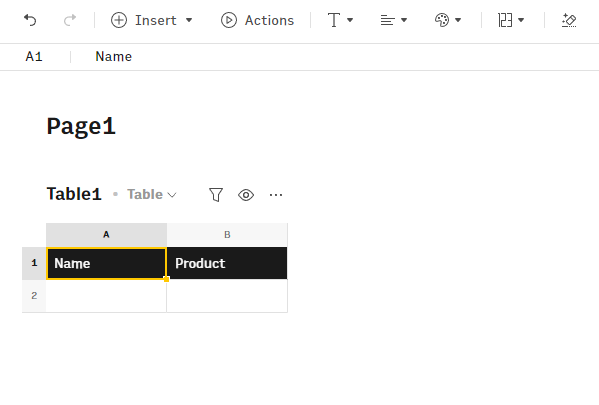
Create a new spreadsheet & add headers
First, let’s create a new spreadsheet that we can use for this scenario.
Make (no pun intended) sure the first row is the header row with column names. We recommend all your columns have text in the first row (known as the header row).
Create a new scenario
Trigger
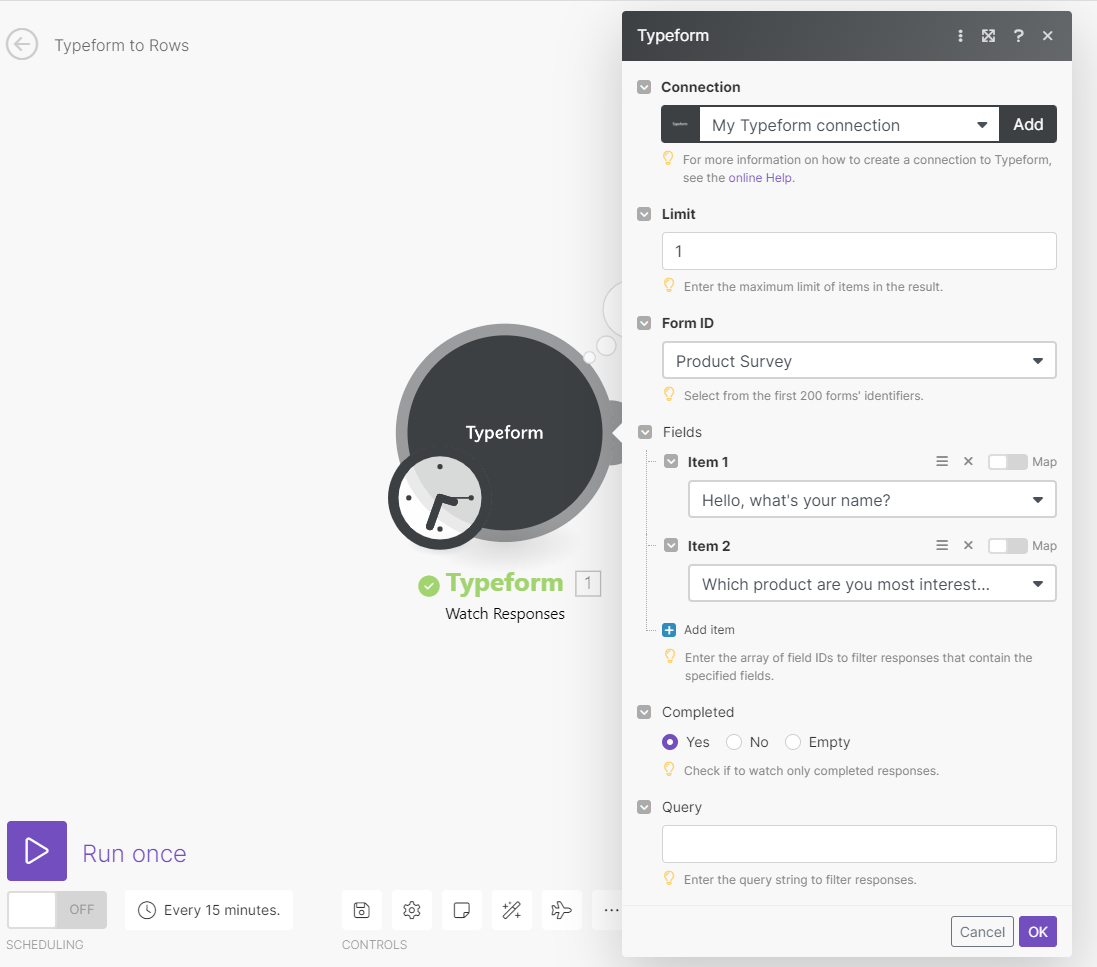
- We're going to use the Typeform module and select "Watch responses" as the trigger.
- Select your Form from the
Form IDdropdown. - Add the fields from your form as items. In this example, we only created 2 questions in our form. "Hello, what is your name?" and "Which product are you interested in?".
- Optional We have chosen to check the "Yes" checkbox for the "Completed" section so that only forms which are completed fully, are sent to the spreadsheet.
Your trigger should look like this:
Action
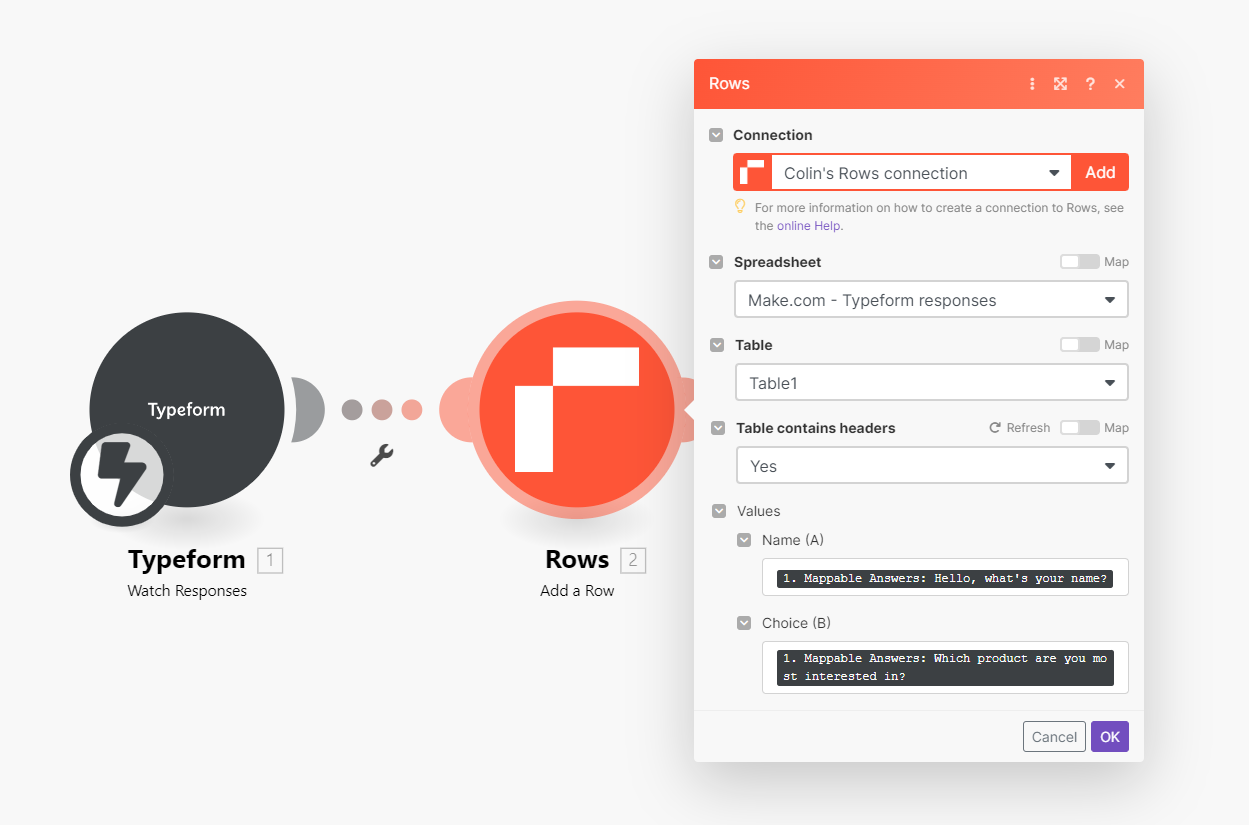
- We want to use Rows for the action, so in the search box we will simply type “Rows” and then select it from the results.
- Select
Add a rowfrom the list of events. - You will now have to connect your Rows account to Make. Under "Connection" select the
Addbutton. - A new window dialogue will appear and ask you for your API key. Enter your API key and click
Save. (Note: How to find your api key) - Click on the dropdown for “Spreadsheet” and select or search for your spreadsheet you created earlier. Select the spreadsheet from the list.
- Click on the dropdown for
Tableand selectTable1(unless you renamed the table - then choose that name). - We want to select
Yesfrom the dropdown for if the table contains headers. This is definitely best practice but not necessary. - We can now set the values for each column in our table.
- Click inside the input field for "Name (A)" and a menu will appear with options from the Typeform module. Under the "Mappable Answers" field, select your first question, which in our case is "Hello, what is your name?"
- Repeat this again for the next column "Choice (B)" by clicking 'Add item' again and this time selecting your second question, in our case, "Which product are you interested in?"
- Click on the 'OK' button to save this modules settings.
Your trigger should look something like this
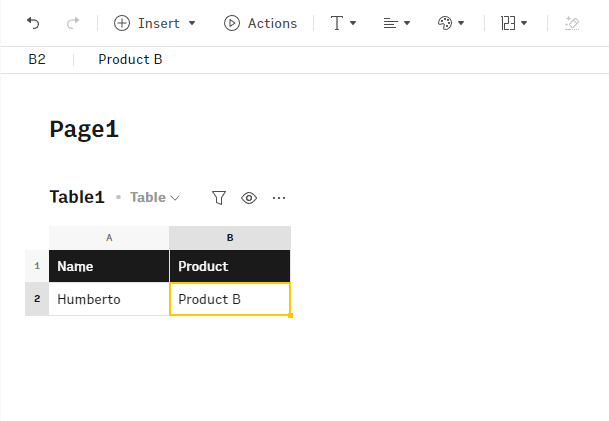
- You can now go to your Typeform and complete the form.
- Once you've submitted the form, go back to Make and select the 'Run once' button near the buttom left, next to the big purple play icon.
Your scenario should run in a matter of seconds and you should see your results in your spreadsheet!
Congratulations! 🥳
You just created your first Make scenario with Rows! Now, every time you get a new Typeform response, a new row inside your Rows spreadsheet will be added with that data!
Choose from more pre-built templates with Rows here or build your own from scratch!
Useful links
- Rows API technical documentation.
- Learn How to Manage your API Keys.
- Learn about the differences between Google Sheets API and Rows API
- Rows integration with Make
- List here on Make
If you have any questions or feedback about Rows API beta, please contact our support team at support@rows.com