How to use the Google Sheets QUERY function [2025]

In this article, you'll learn all you need to know about using the QUERY function in Google Sheets. You'll also learn what the QUERY function is, examples of QUERY commands, and much more.
What is the Google Sheets QUERY function?
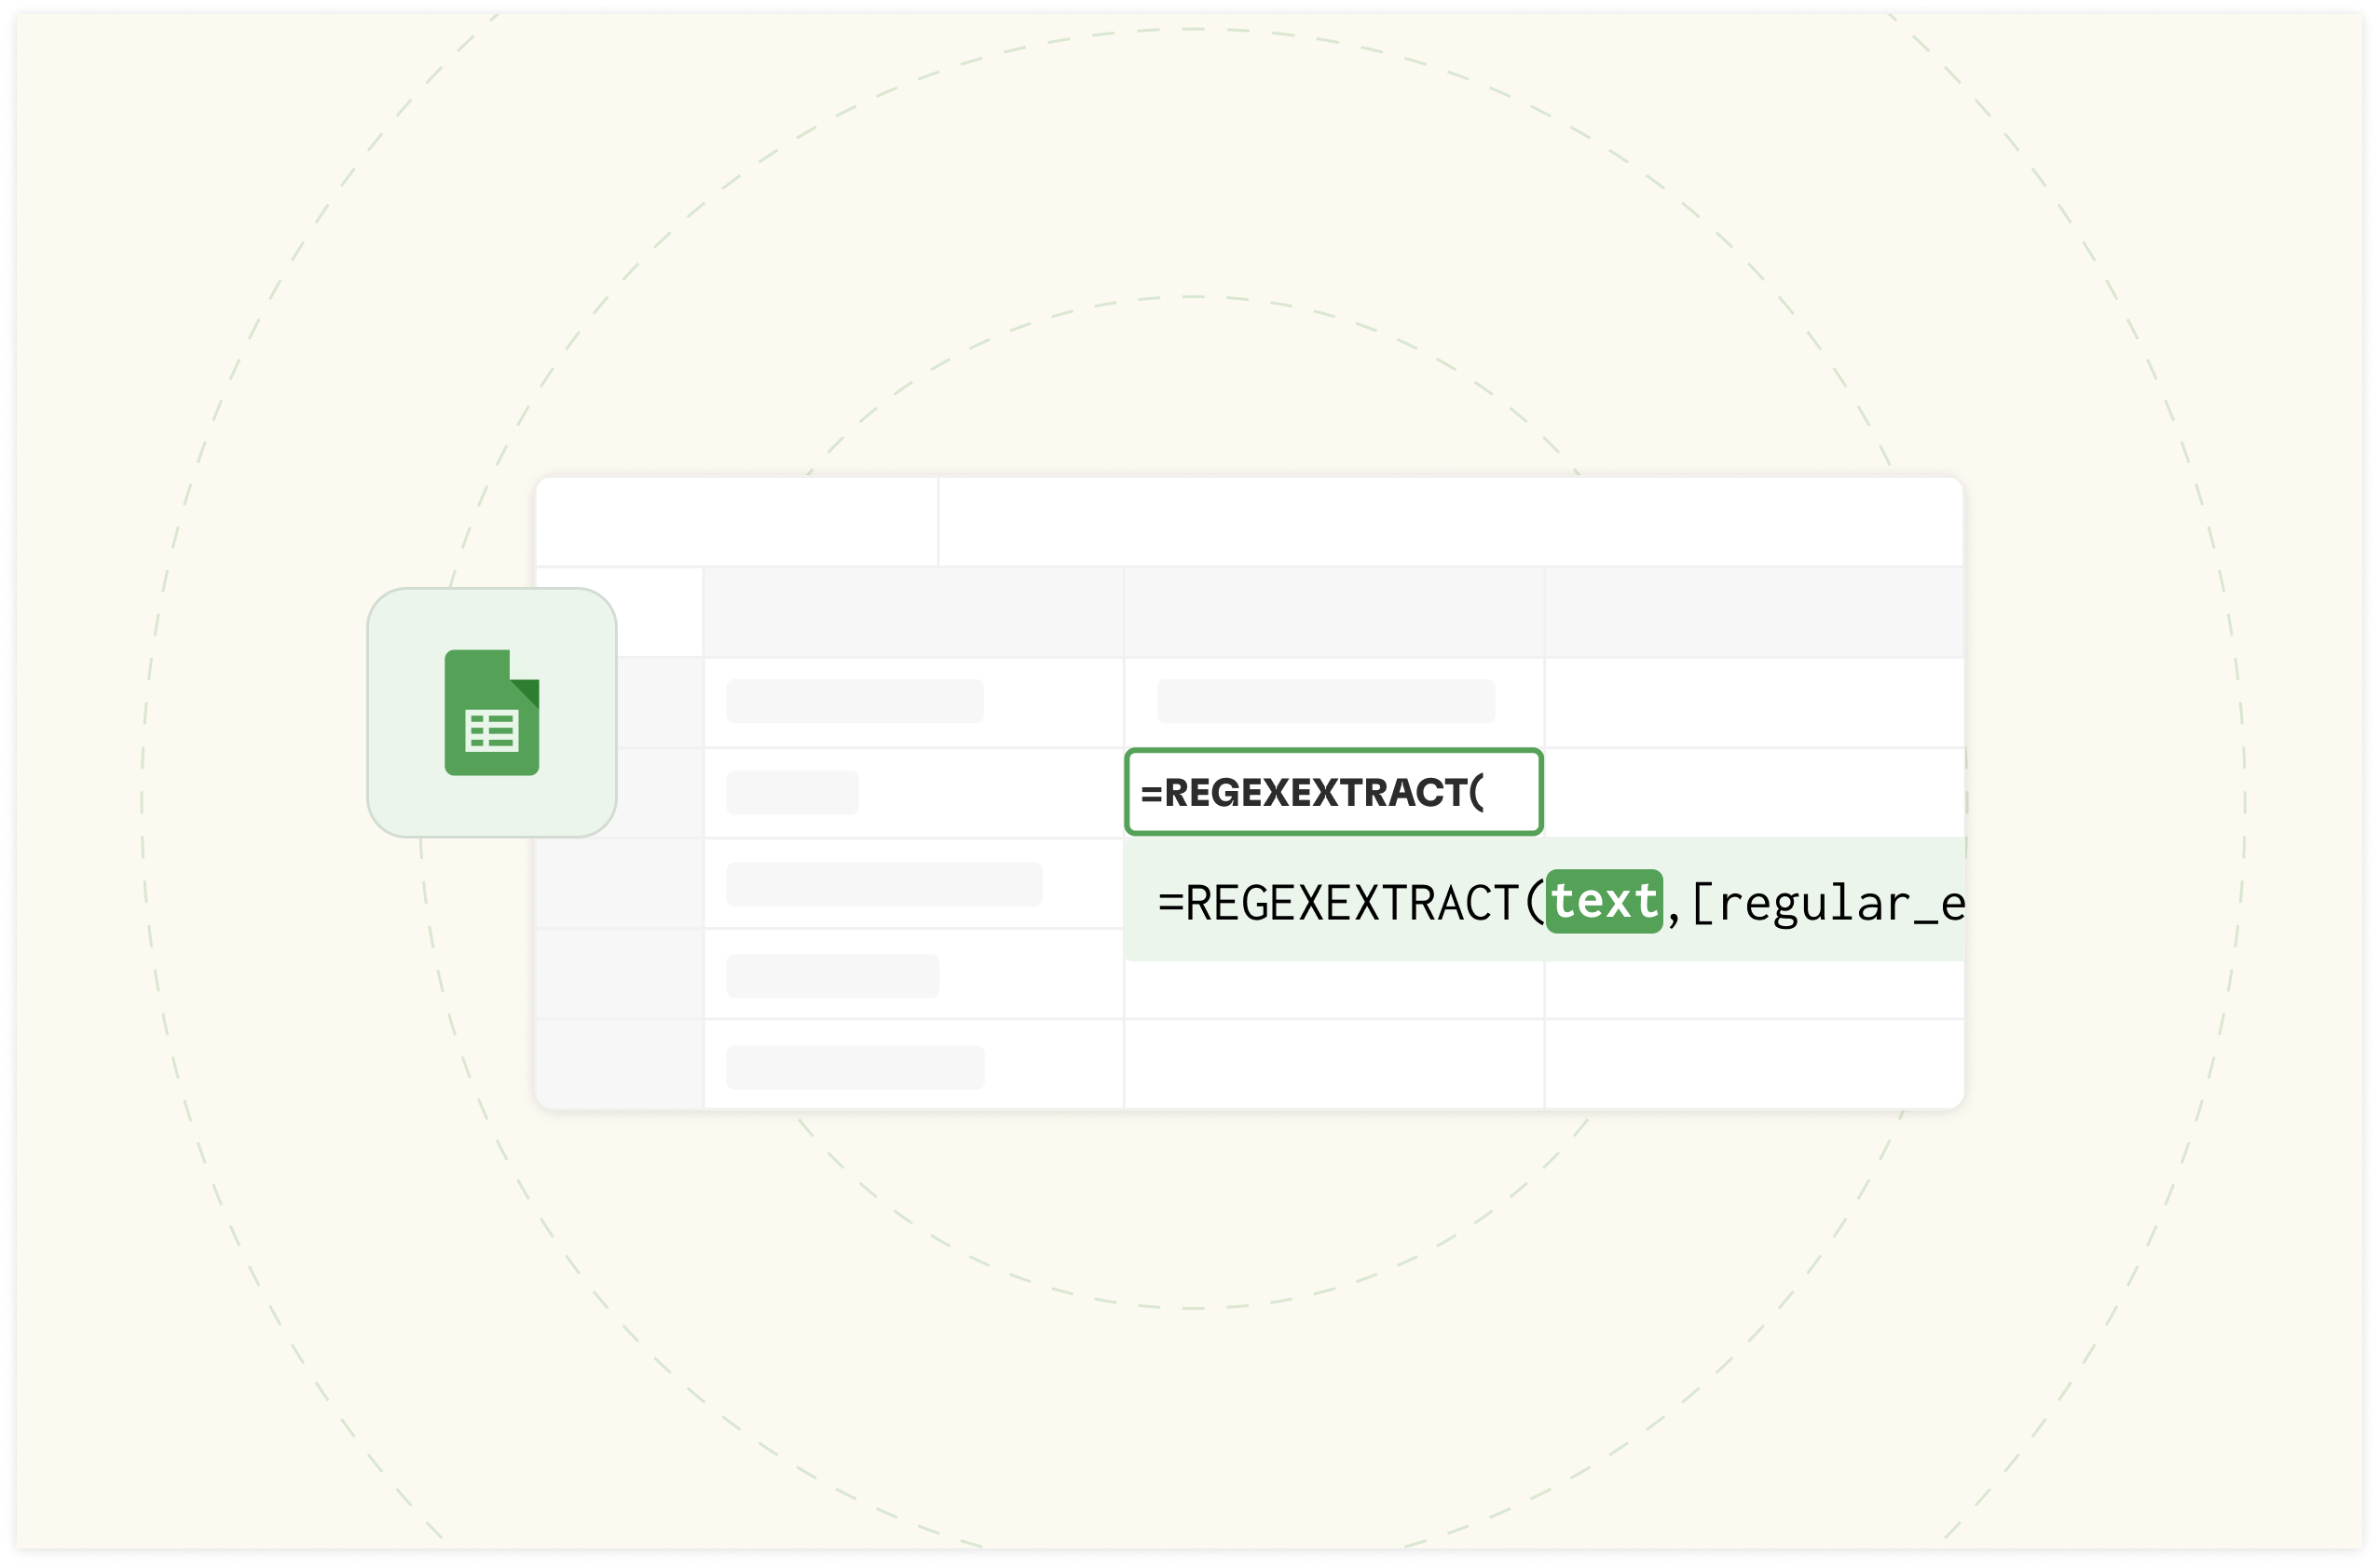
The Google Sheets QUERY function is akin to a librarian managing a vast library catalog.
It is a powerful tool that allows users to tweak and analyze spreadsheet data using an SQL-like syntax. It allows you to filter, manipulate, and perform calculations on large datasets within Google Sheets.
Definition of the QUERY Function
QUERY function is a multi-functional tool that allows users to run SQL-like queries on spreadsheet data.
It does the following:
powerful data manipulation,
filtering,
and analysis directly within a spreadsheet.
Unlike many other functions that perform single operations, QUERY can combine multiple data tasks – such as filtering, sorting, and calculations – in a single formula.
In addition, QUERY is good at handling large datasets more efficiently than many other functions. It processes data at the source rather than pulling all the data into the formula, which can improve performance for large sheets.

The spreadsheet where data comes to life
Connected to your business data. Powered by AI. Delightful to share.
Try Rows for FreeBasic Syntax of the QUERY Function
The basic syntax of the QUERY function is:
=QUERY(data_range, query, [headers]) — this is the QUERY formula.
Where:
data_range is the range of cells containing your data. It can be a named range or a direct cell reference. For example: A1:D100.
There are four ways the data can be expressed;
- As something distinct, such as A1
- As an entire column, such as A
- As literals, such as 'Jack & Jill' *NOTE: A comma separates each literal and would be placed in its column.
- As an aggregate function, such as SUM, COUNT, AVERAGE, MIN & MAX for arithmetic operations.
Note: Aggregate functions are mainly used with the GROUP BY clause.
query is a string with SQL-like commands. This is the SQL command that will be used against the data provided. The SQL command consists of several clauses — SELECT clause, WHERE clause , LABEL clause e.t.c — some of which are mandatory and others which are optional. Below is a definitive list of all clauses available within Rows.
Leaving this argument empty will result in a "SELECT *" command that will return all results from the requested data.
headers (optional parameter) specifies the number of header rows in your data. If omitted, QUERY assumes the first row is the header. This is how many rows are considered the headers of the data. The default is 1.
An example of how it works:
Let's say you have a spreadsheet with columns A to C containing data about marketing budgets, with headers in row 1. To select all sales over $500, you might use:
=QUERY(A1:C100, "SELECT A, B, C WHERE C > 500", 1)
This formula helps this way:
Uses data from the range A1:C100 — from values across rows on the original table.
Selects all column headers (A, B, C). In other cases you might select a single column.
Filters for rows where column C (assuming it's the marketing budget amount) exce toolseds 500. This specifies that there is 1 header row
Comparison with Other Google Sheets Functions
How does QUERY compare to FILTER?
FILTER is a function that allows you to sort the data that you see when you view a spreadsheet
QUERY filters too. And Aadditionally, it aggregates and selects specific columns in one operation
How does QUERY compare with SORT?
SORT is dedicated to sorting, while QUERY can sort as part of a more complex operation. Secondly, SORT uses a simpler syntax with direct column references.
QUERY uses SQL-like language.
How does QUERY compare to VLOOKUP?
Vertical lookup is used to find and retrieve data from a specific column, whereas QUERY can locate and retrieve data from any column on your spreadsheet.
Now, the question is this: in what scenarios does QUERY stand out?
Complex Operations: When you need to do multiple tasks on one spreadsheet. It can also handle complicated calculations. This works through combinations of values on your source sheet.
Large datasets: QUERY often performs faster on big data ranges.
Multiple column selection: You can easily select or exclude columns based on conditions.
How to use QUERY in Google Sheets?
In this section, we'll unravel the step-by-step guide to writing a basic QUERY.
Step-by-Step Guide to Writing a Basic QUERY
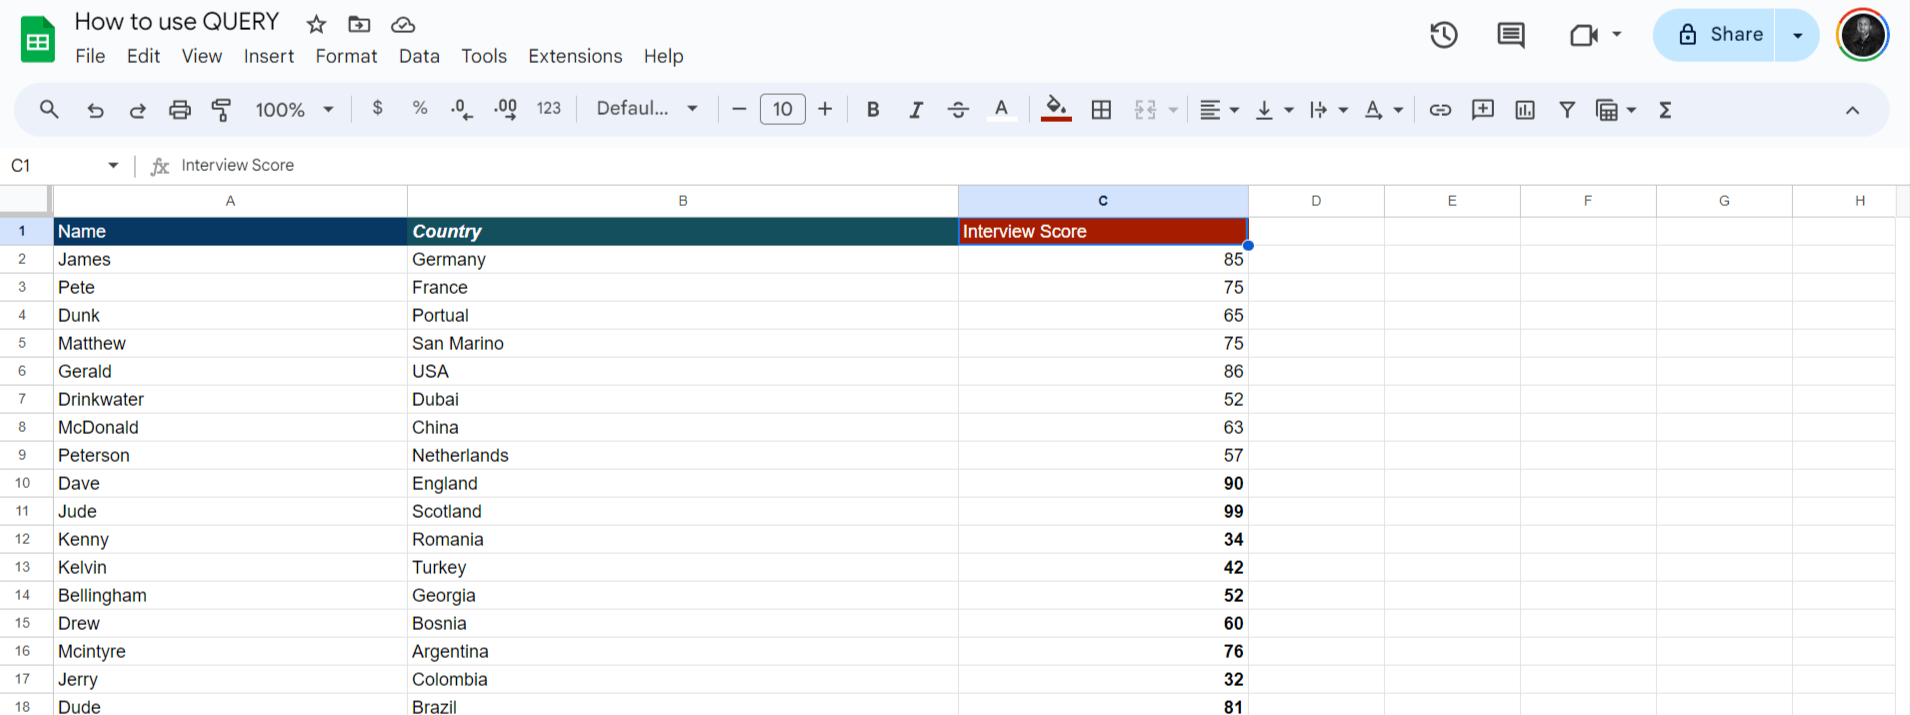
Step 1: Open the spreadsheet in Google Sheets. Of course, your spreadsheet should be like this or even bigger. For this example, we have 3 columns.
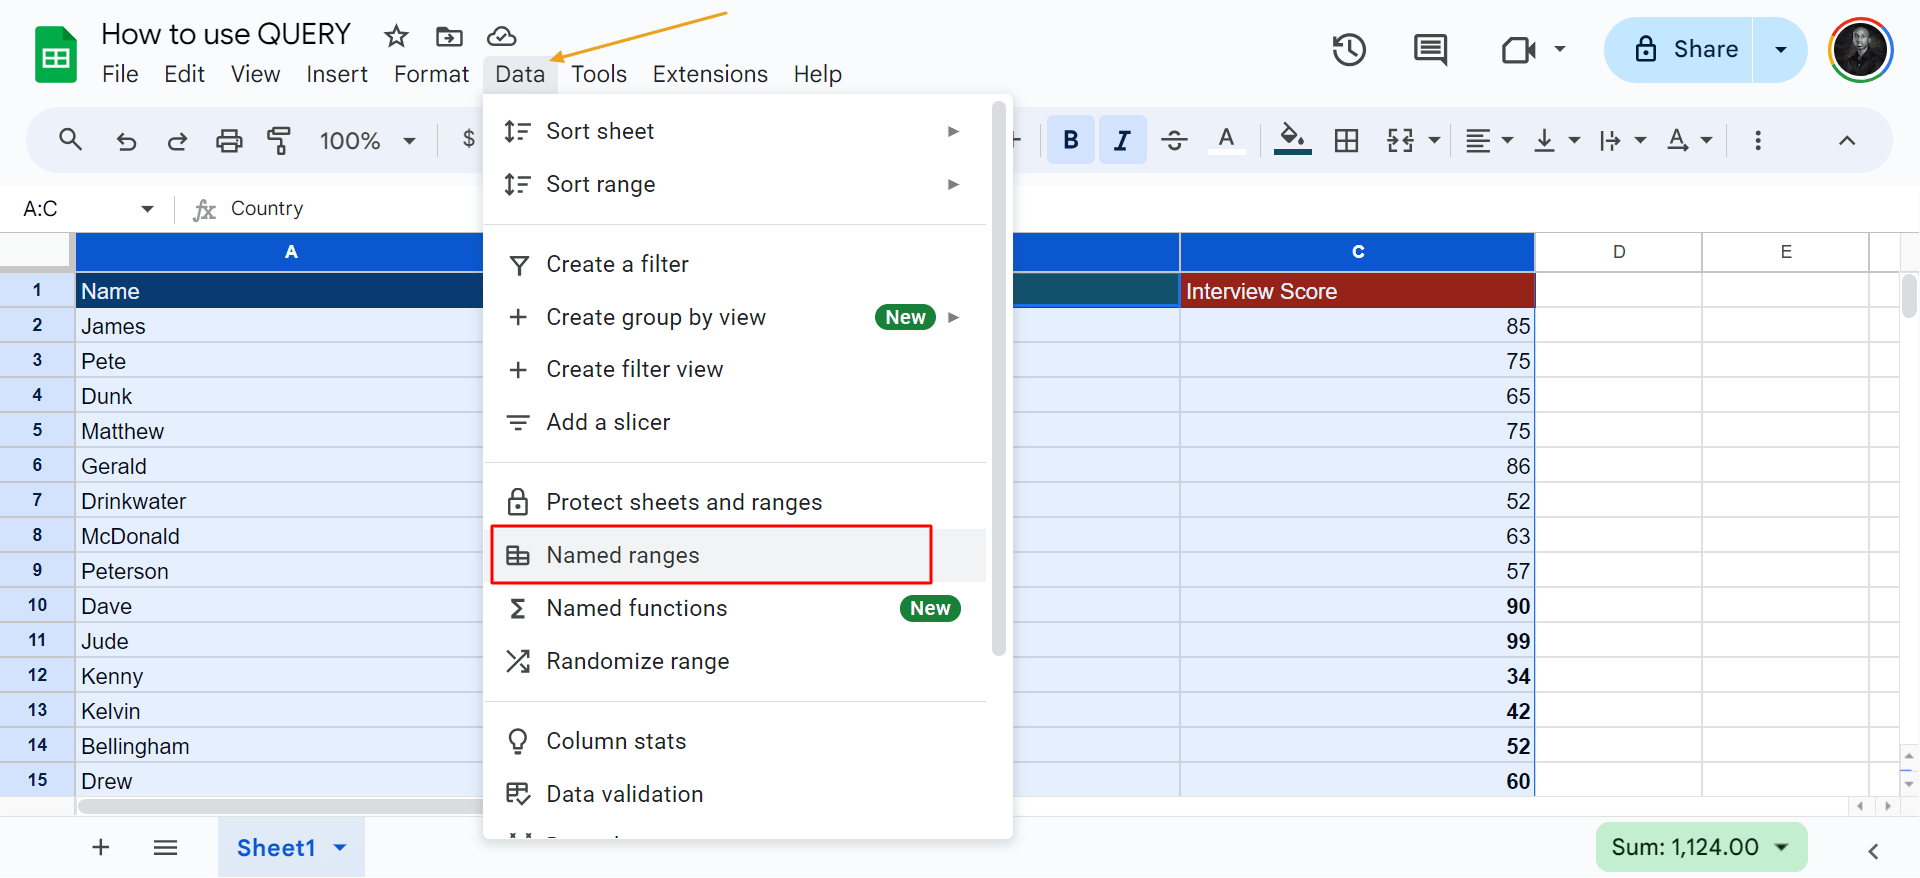
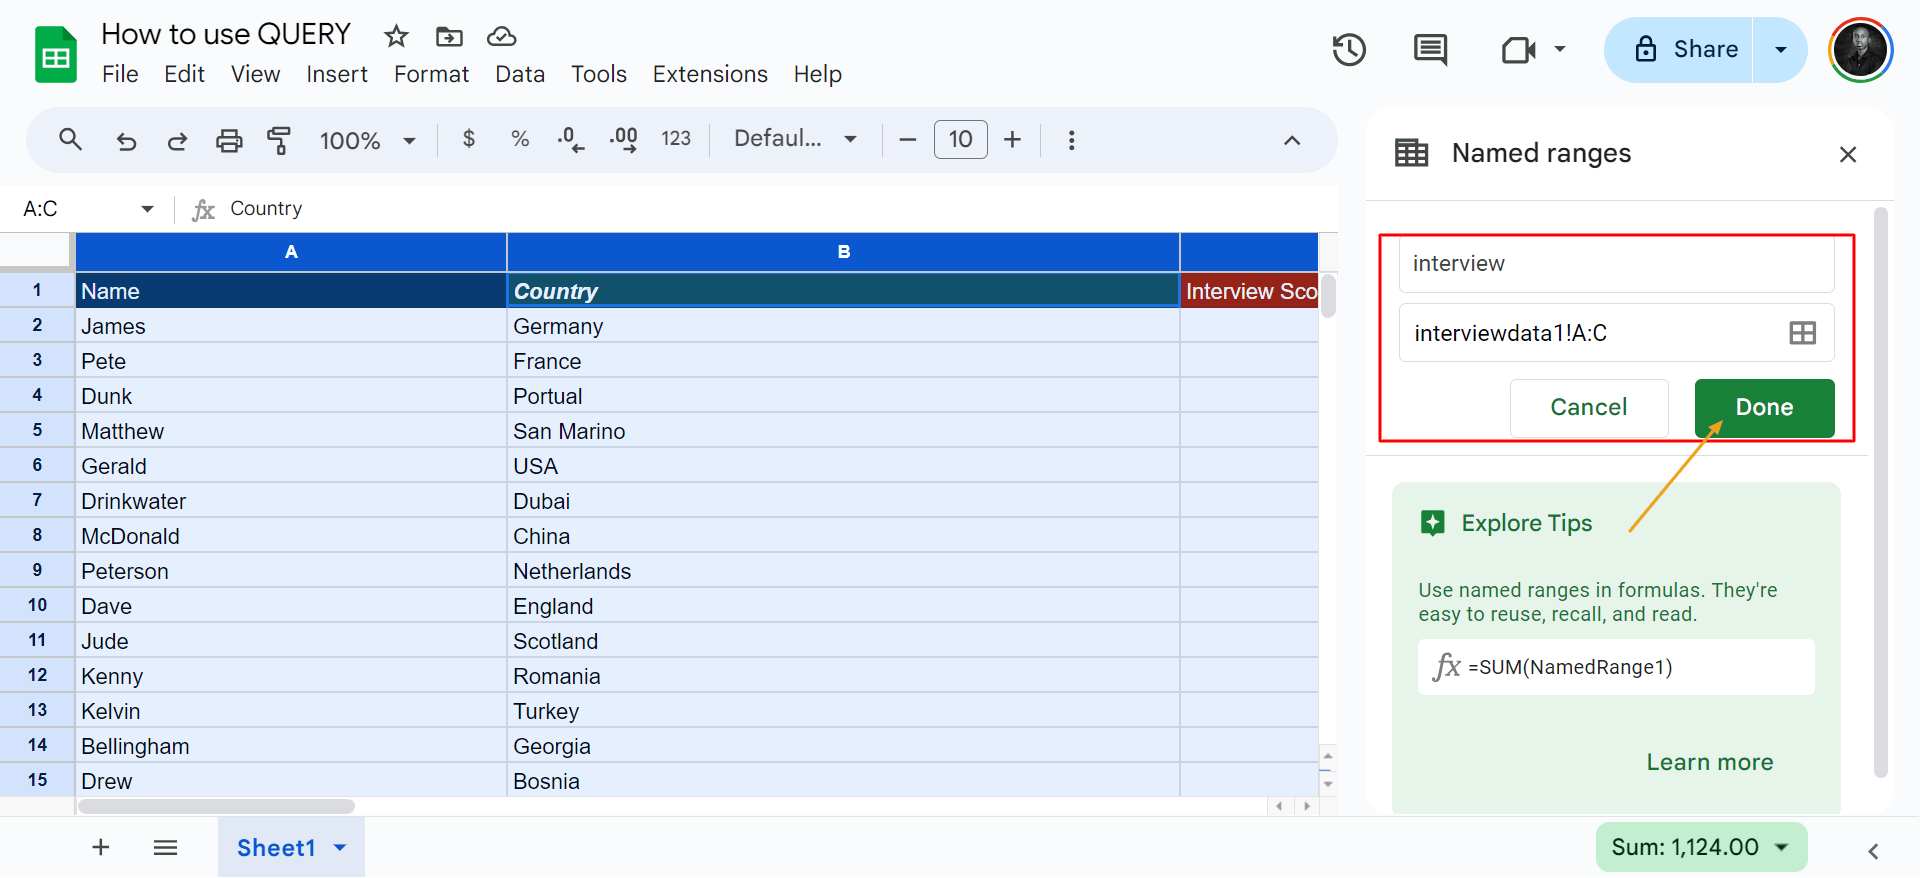
Step 2: Highlight your data. And click “Data”. Afterward, click “Named ranges.”
Step 3: After the previous step, you'll see a side panel on the left side. Input how you wish to name your data range and click “Done.”
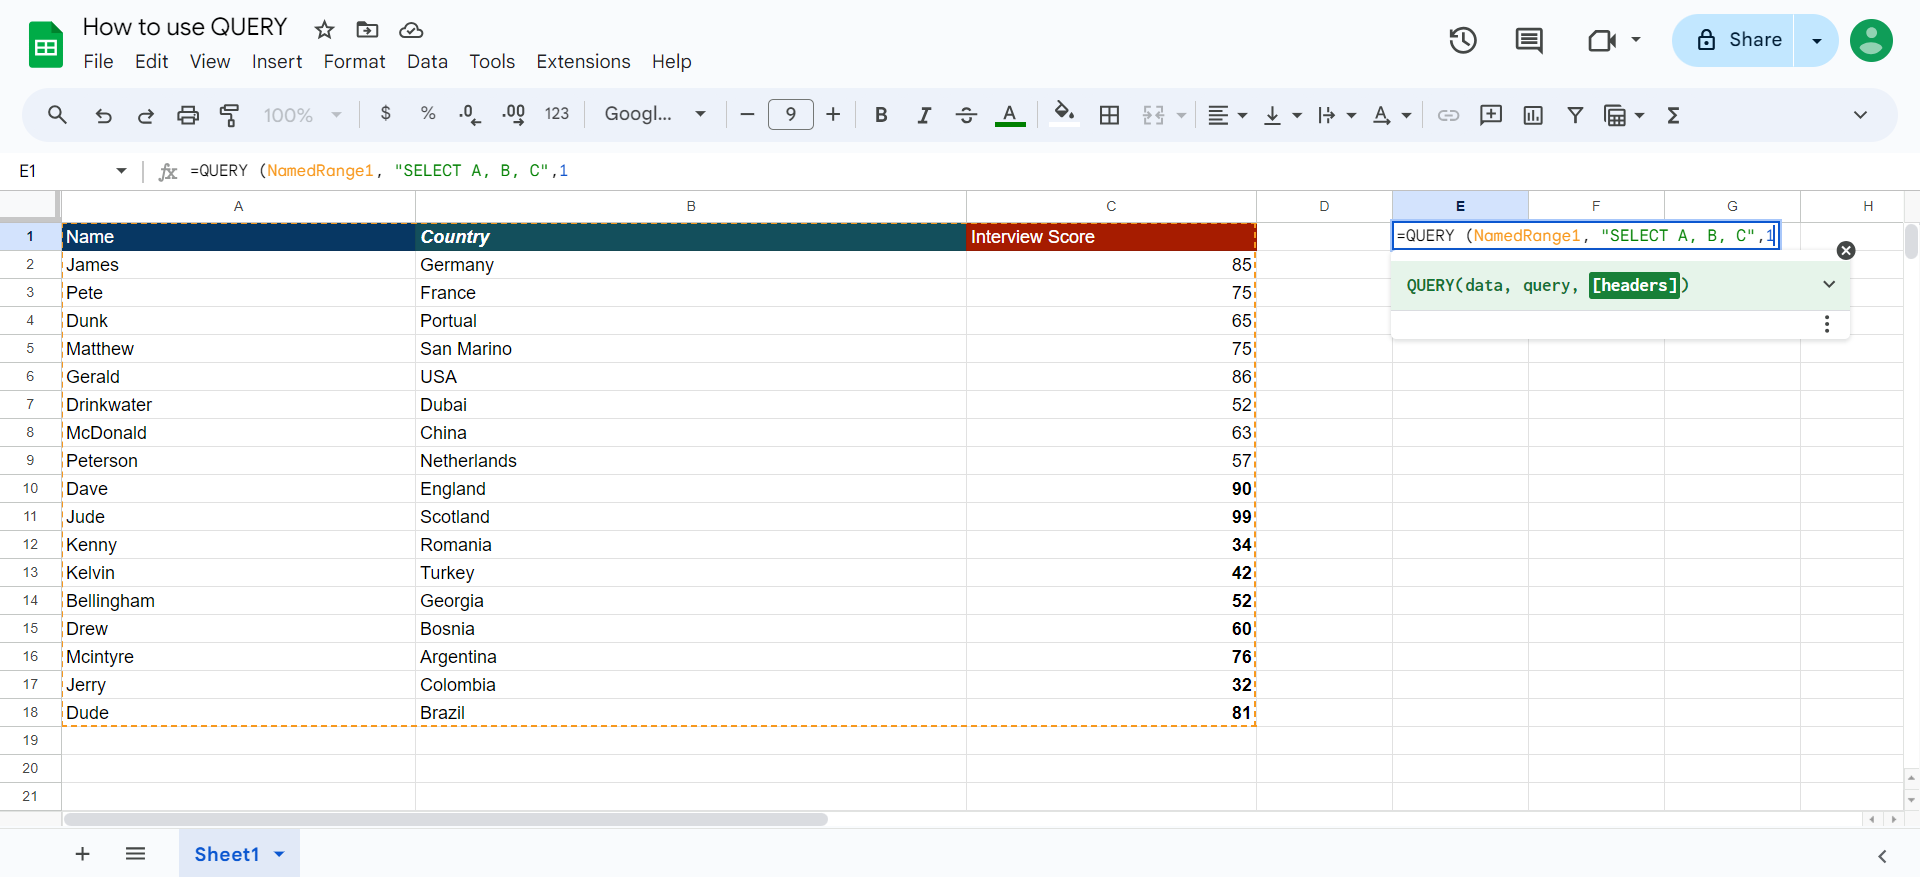
Step 4: How to write Basic Query String
To write a basic QUERY string, you need to follow this formula: =QUERY(data, query, headers)
After the opening parenthesis, enter your data range (e.g., A1:D100). Once you type in this on a blank cell, all data selected will be highlighted.
Using SELECT Statements
You can also use the SELECT command to Choose columns.
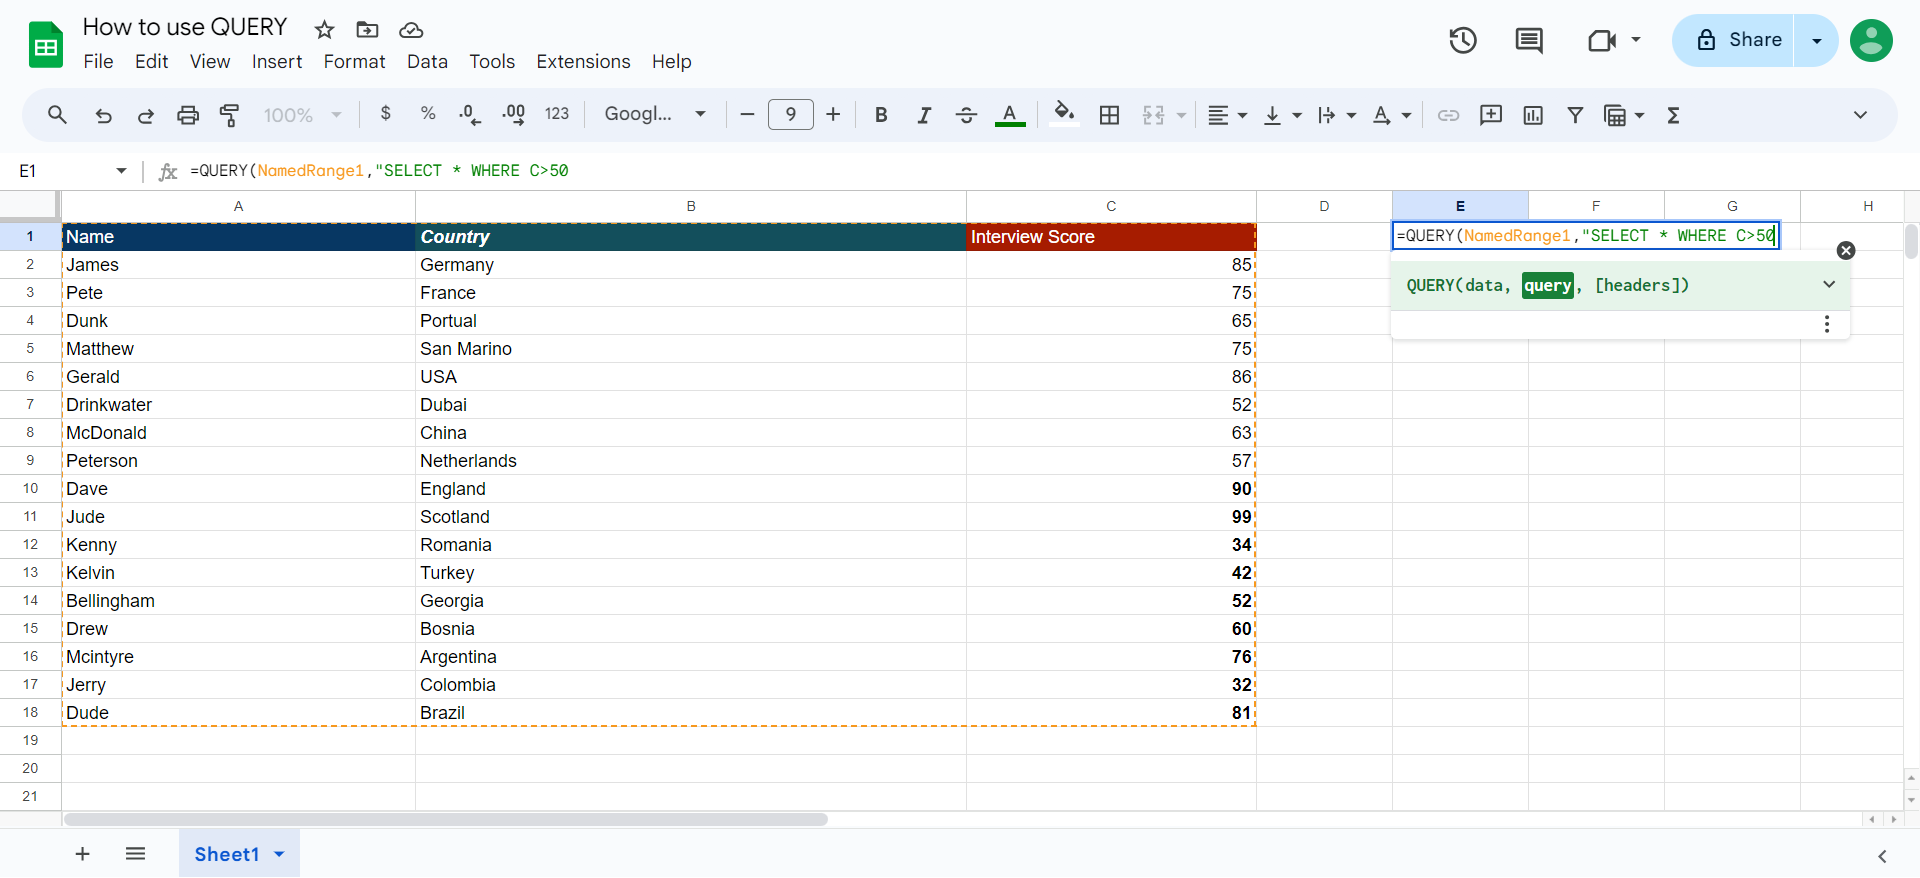
Step 1: Start with SELECT followed by column letters afterward:
Full example: =QUERY(A1:D100, "SELECT A, B, C")
Here's an example:
Step 2: After writing your query, close it by adding quotes and parenthesis, then press Enter to execute.
And boom! You'll see your query result on the left side of your sheet.
Filtering with WHERE clauses
The WHERE clause in an SQL (Standard Query Language) query is used to filter records that fulfill a specified condition
With the WHERE clause, you can use conditions like =, >, <, and <>. And even other alphabetic conditions.
Note: WHERE is usually added after the SELECT statement with an asterisk (*) preceding it.
Step 1: How to do basic WHERE function
Use this formula : =QUERY(A1:D100, "SELECT * WHERE B > 1000")
An example below:
Using the previous steps in the SELECT command, press enter, and you'll get an output of your query.
For example, on our end, after using the query: =QUERY(NamedRange1, “SELECT * WHERE C > 50)
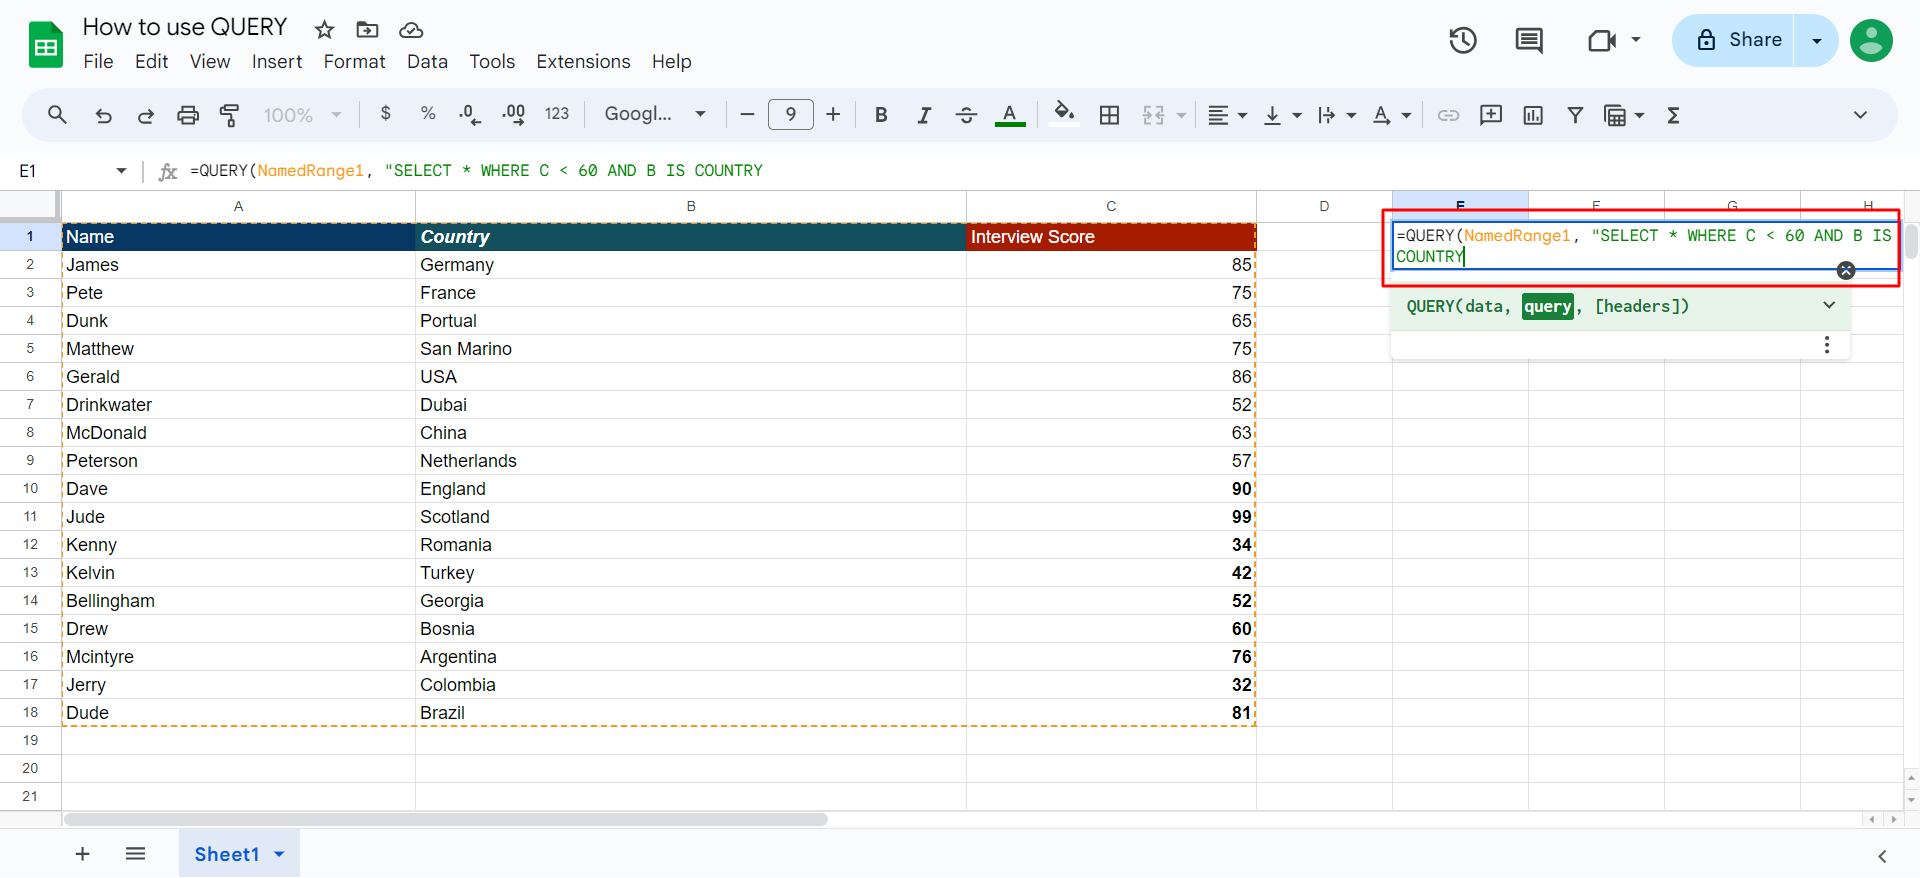
You can also execute compound tasks like using two variables of your data sheet. Here's an example below:
What are the drawbacks of using Google Sheets for QUERY Function?
While Google Sheets’ QUERY is helpful, it still has some drawbacks. Let's take a look at the downsides:
Lack of advanced SQL features
The QUERY function on Google Sheets lacks advanced SQL features such as sub-queries window functions.
Missing Automation
In the AI era, Google Sheets fails to automate an otherwise manual job. It lacks AI-powered features that help you manipulate data and extract insights.
Performance issues
The QUERY function can become slow when dealing with very large datasets, especially those with thousands or millions of rows.
When tested on a dataset of 8k records, Google Sheets' QUERY resulted 8-10x slower than its peer in Rows. Watch the head-to-head comparison.
The spreadsheet where data comes to life
Connected to your business data. Powered by AI. Delightful to share.
Try Rows for FreeHow to use the QUERY function on Rows?
Rows is a comprehensive spreadsheet for modern teams that offers a tidier UI, automated data ingestion capabilities and native AI features capabilities (AI Analyst, AI-generated subtitles, native AI functions) that make reporting more accessible and faster.
In Rows, the QUERY function replicates the standard behavior of the Google Sheets one.
Our standout feature is our remarkable AI Analyst.
With it, you can use natural language to ask any question about the data and automate the QUERY output.
Follow the steps below to use QUERY function on Rows
Step 1: Visit Rows.com. You can start using the product for free right away without signing up. You get access to unlimited sheets, an AI analyst, and other features. Next up, Import and ingest data from your favorite tool on your blank spreadsheet, for example Google Search Console:
Step 2: Click on the ✨ icon on any table
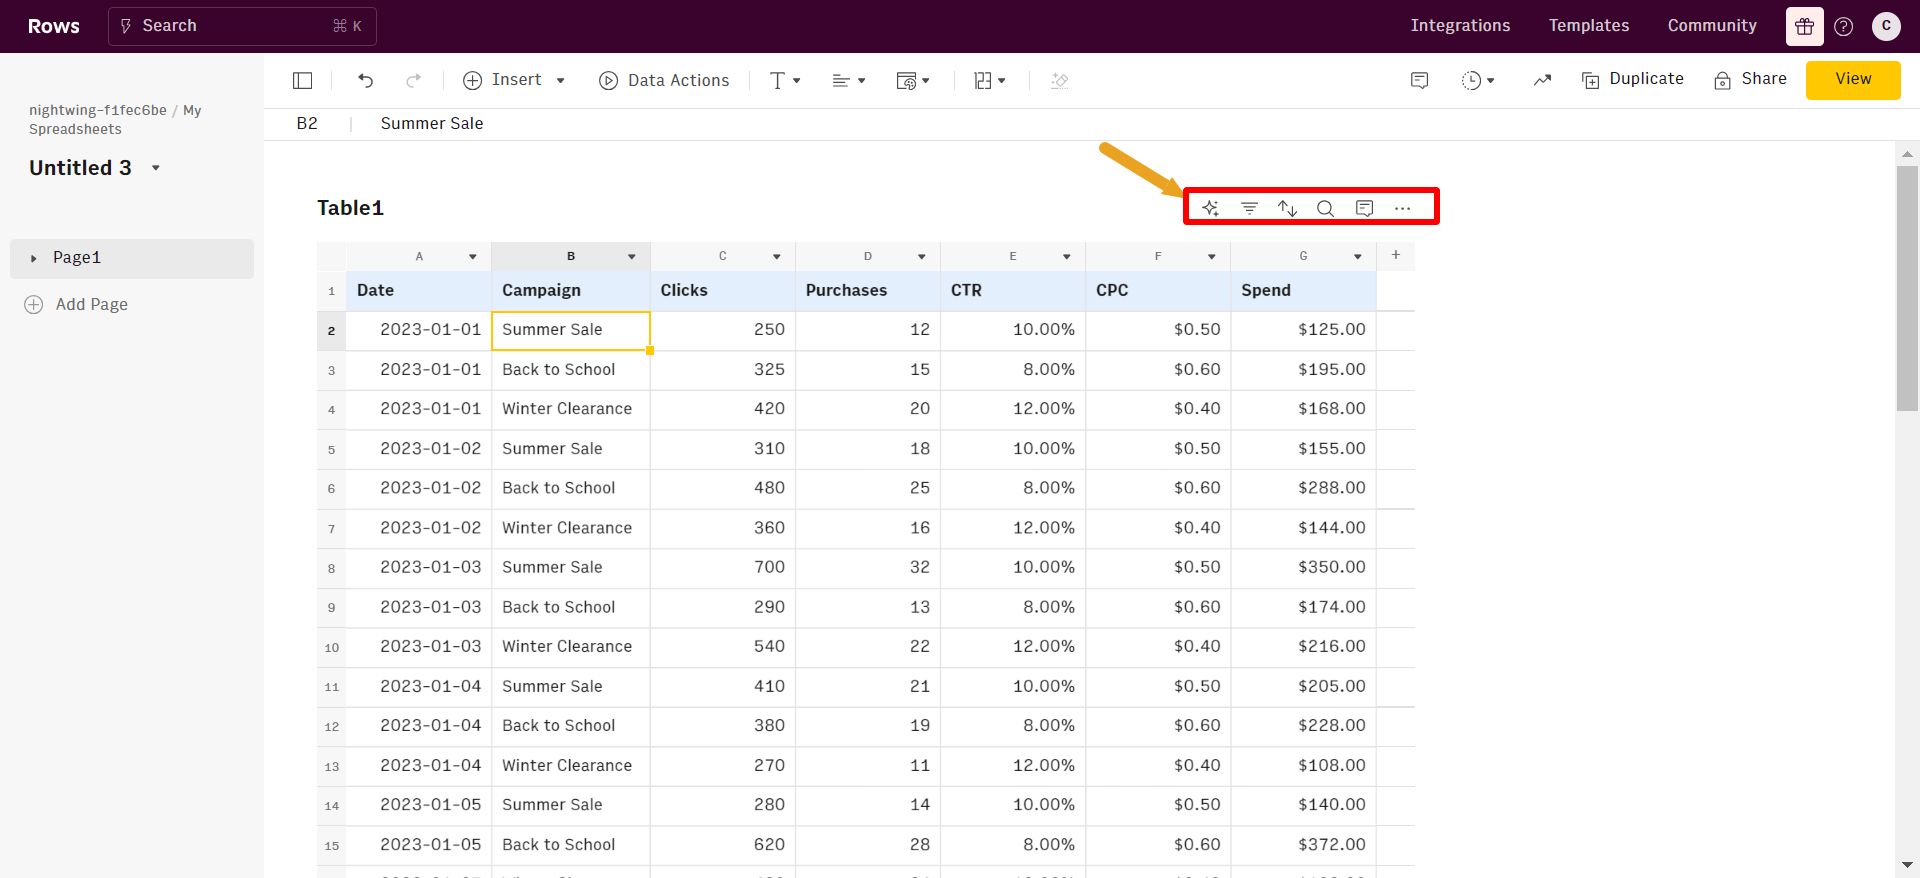
The Deep Dives are ready-made tables that summarize, slice or pivot the data (a QUERY syntax backs all of them)
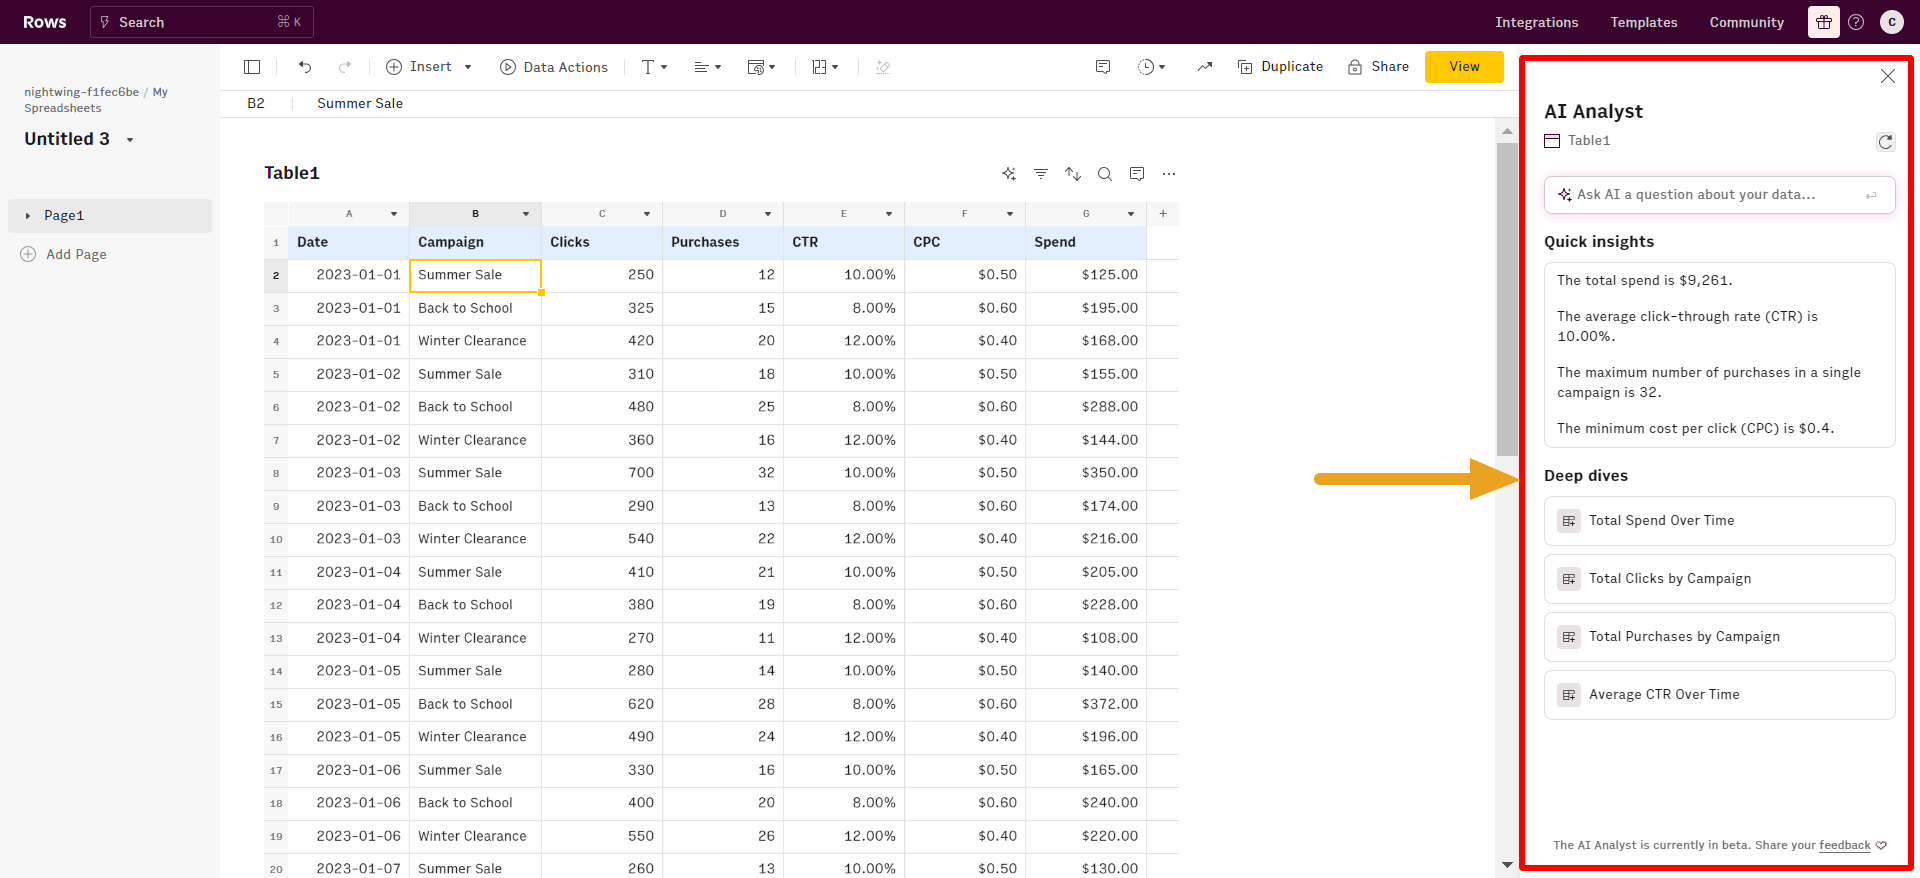
Step 3: On the top bar, you can ask in plain natural language to perform a query on a dataset. Examples:
pivot data fetched from GA4
or summarize data from a Notion database
While this is great for non-expert users to bypass the complexity of the quasi-SQL syntax of QUERY to profit from the Analyst to its full potential, it’s important to get familiar with the main aspects of the QUERY function.
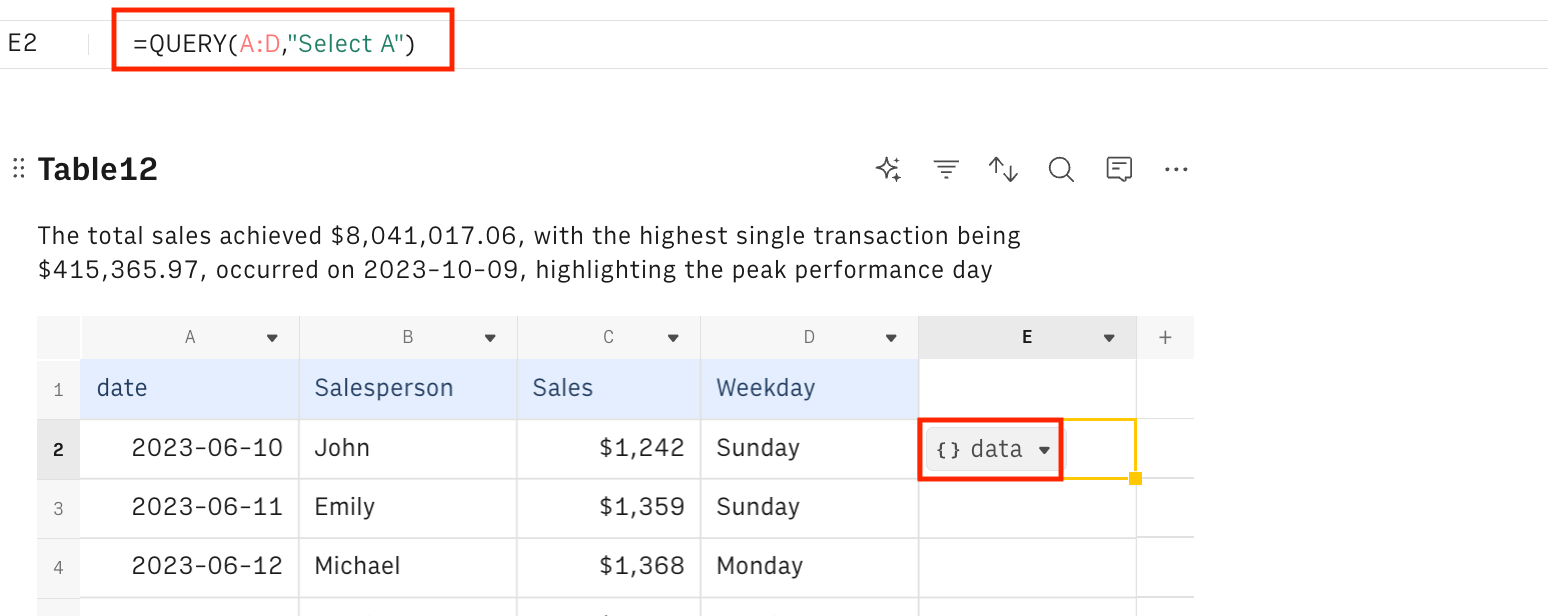
How to use the QUERY function manually
You can use it in the grid just by typing “=QUERY()” in the grid
Unlike in Google Sheets, the output is a [data] cell, i.e., a JSON that needs to be expanded (i.e., rendered) as a able by right-clicking on it
or through the Insert > Functions > Standard. This wizard has a better UI that lets you input the query in a more convenient manner compared to Google Sheets. Afterward, click execute function.


What are the various QUERY commands (clauses)?
Below, we will outline the basics of what can be done through SQL, but we highly advise familiarising yourself with SQL through other educational content.
It is important to note that the clauses should always be used in this order;
1. SELECT: This supports 2 methods;
- Selections with SELECT or
- mathematical operations with SUM, MIN, MAX, AVERAGE, COUNT.
2. WHERE: WHERE is a conditional clause used to filter the *data*. It accepts all arithmetic operators, such as;
- = is equal to
- != is not equal to
- > is greater than
- < is less than e.t.c
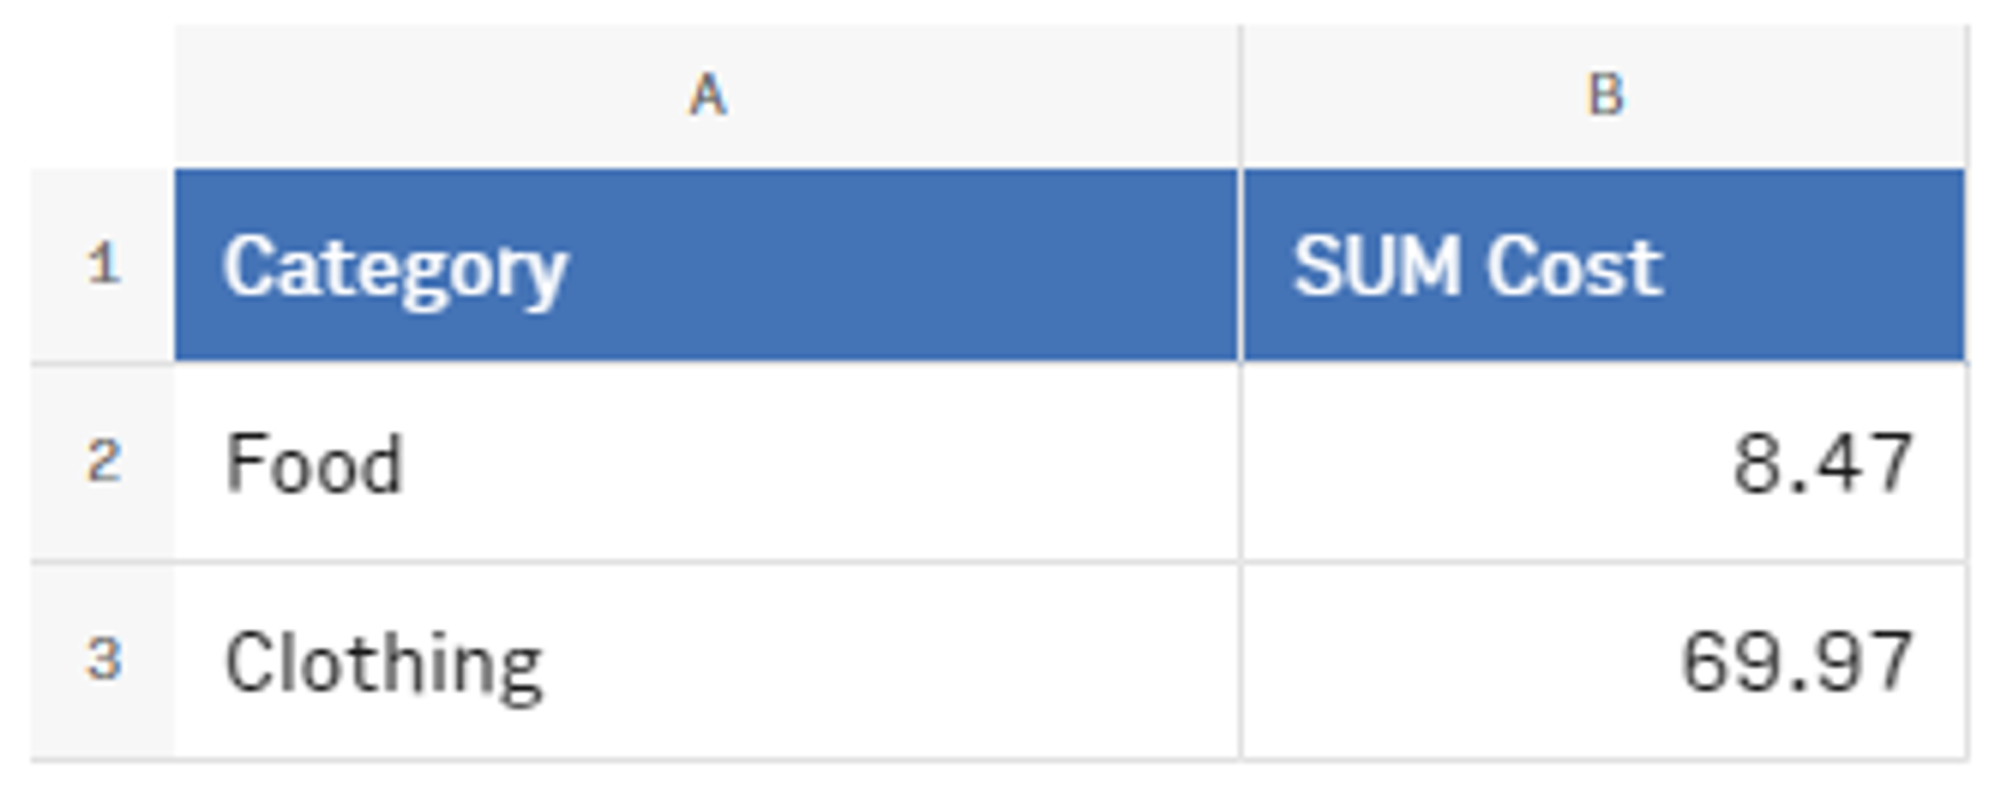
3. GROUP BY: GROUP BY allows you to group the result set by one or more columns, providing a more granular view of the data.
It can be helpful when you want to summarize or analyze data in your spreadsheet by groups or categories. For example, you could use the GROUP BY clause to calculate the average cost, maximum quantity, or total sales for each product category.
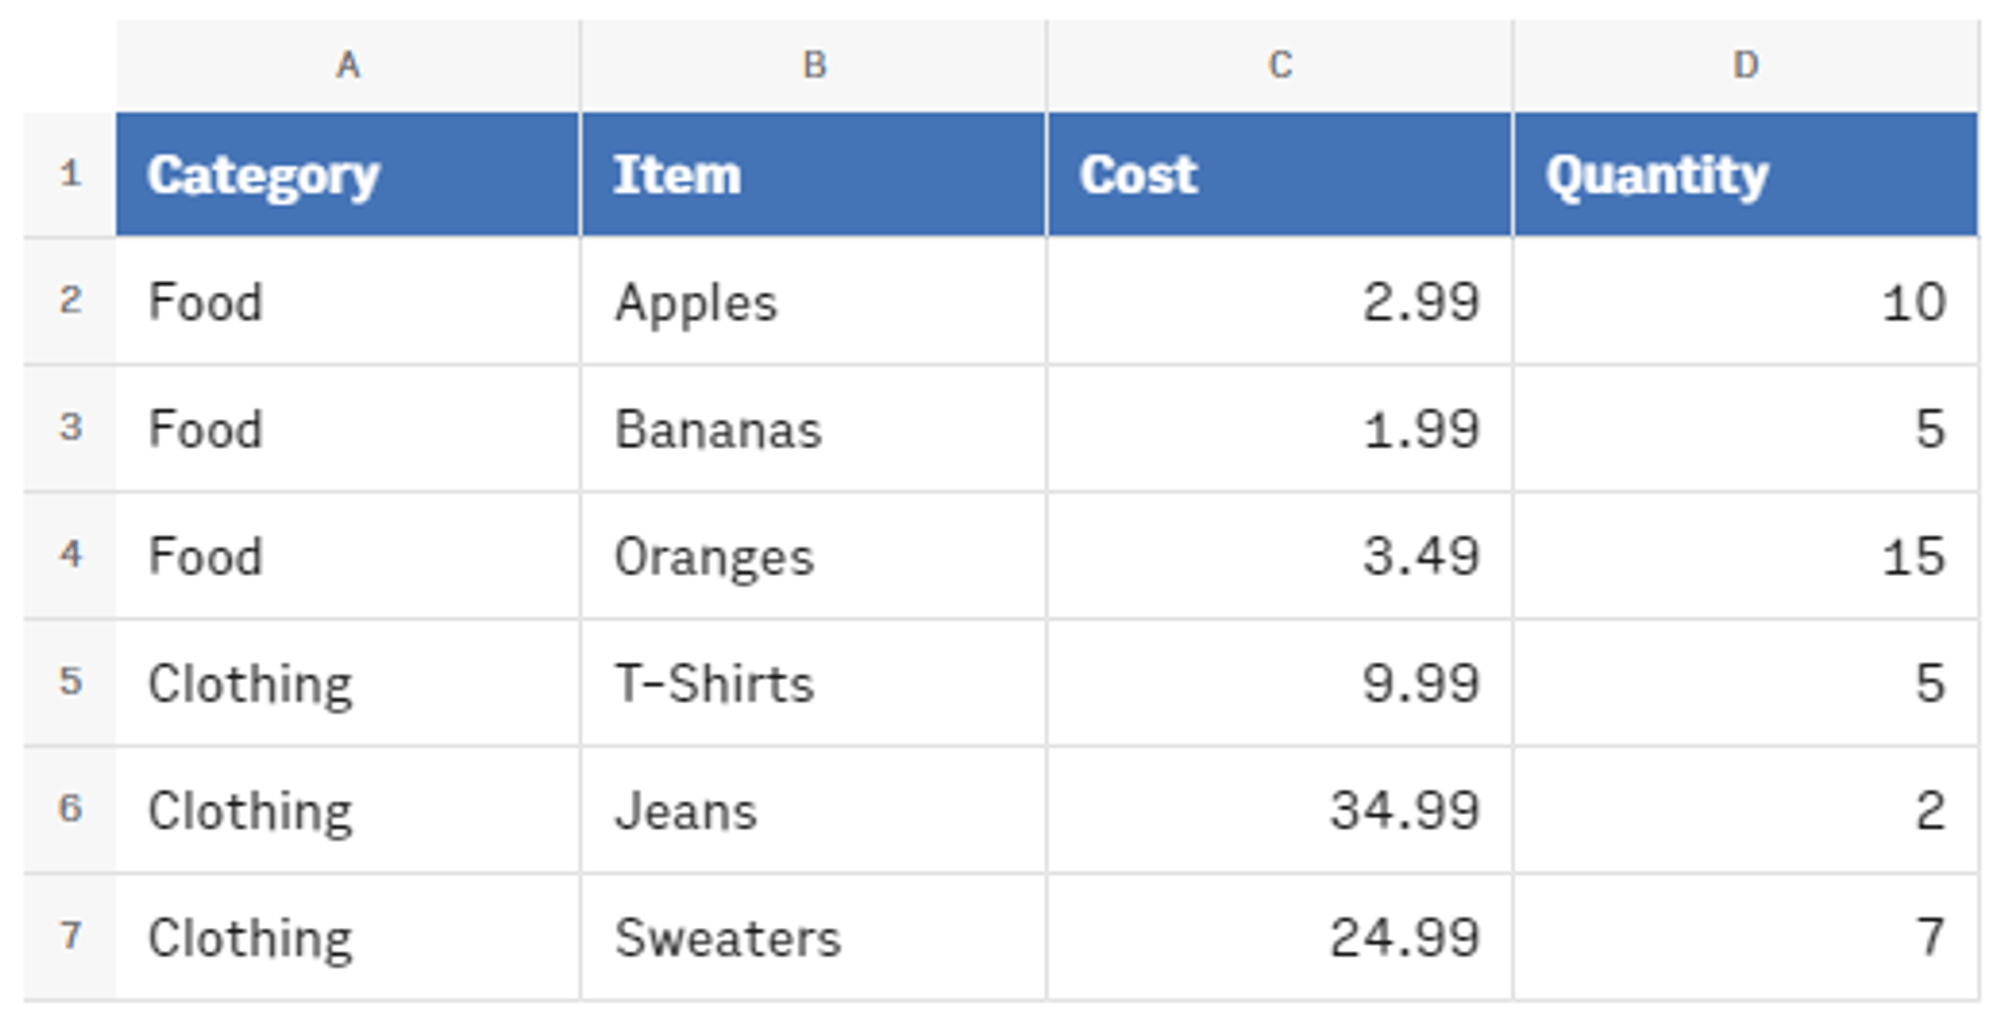
If we wanted to create a pivot table that shows the total cost of each item within each category, we can use the following QUERY function:
`=QUERY(A1:D7,"SELECT A, SUM(C) GROUP BY A")`
4. PIVOT: PIVOT rearranges and summarizes the data in a table. It allows you to transpose the data from a horizontal orientation (rows) to a vertical orientation (columns) or vice versa. This can be useful for creating pivot tables, which are a common way of summarizing and analyzing large sets of data.
For example, if we wanted to create a pivot table that shows the total cost of each item within each category, we could use the following QUERY function:
`=QUERY(A2:D7,"SELECT A, SUM(C) group by A PIVOT B")`
From this:
To this, through PIVOT:

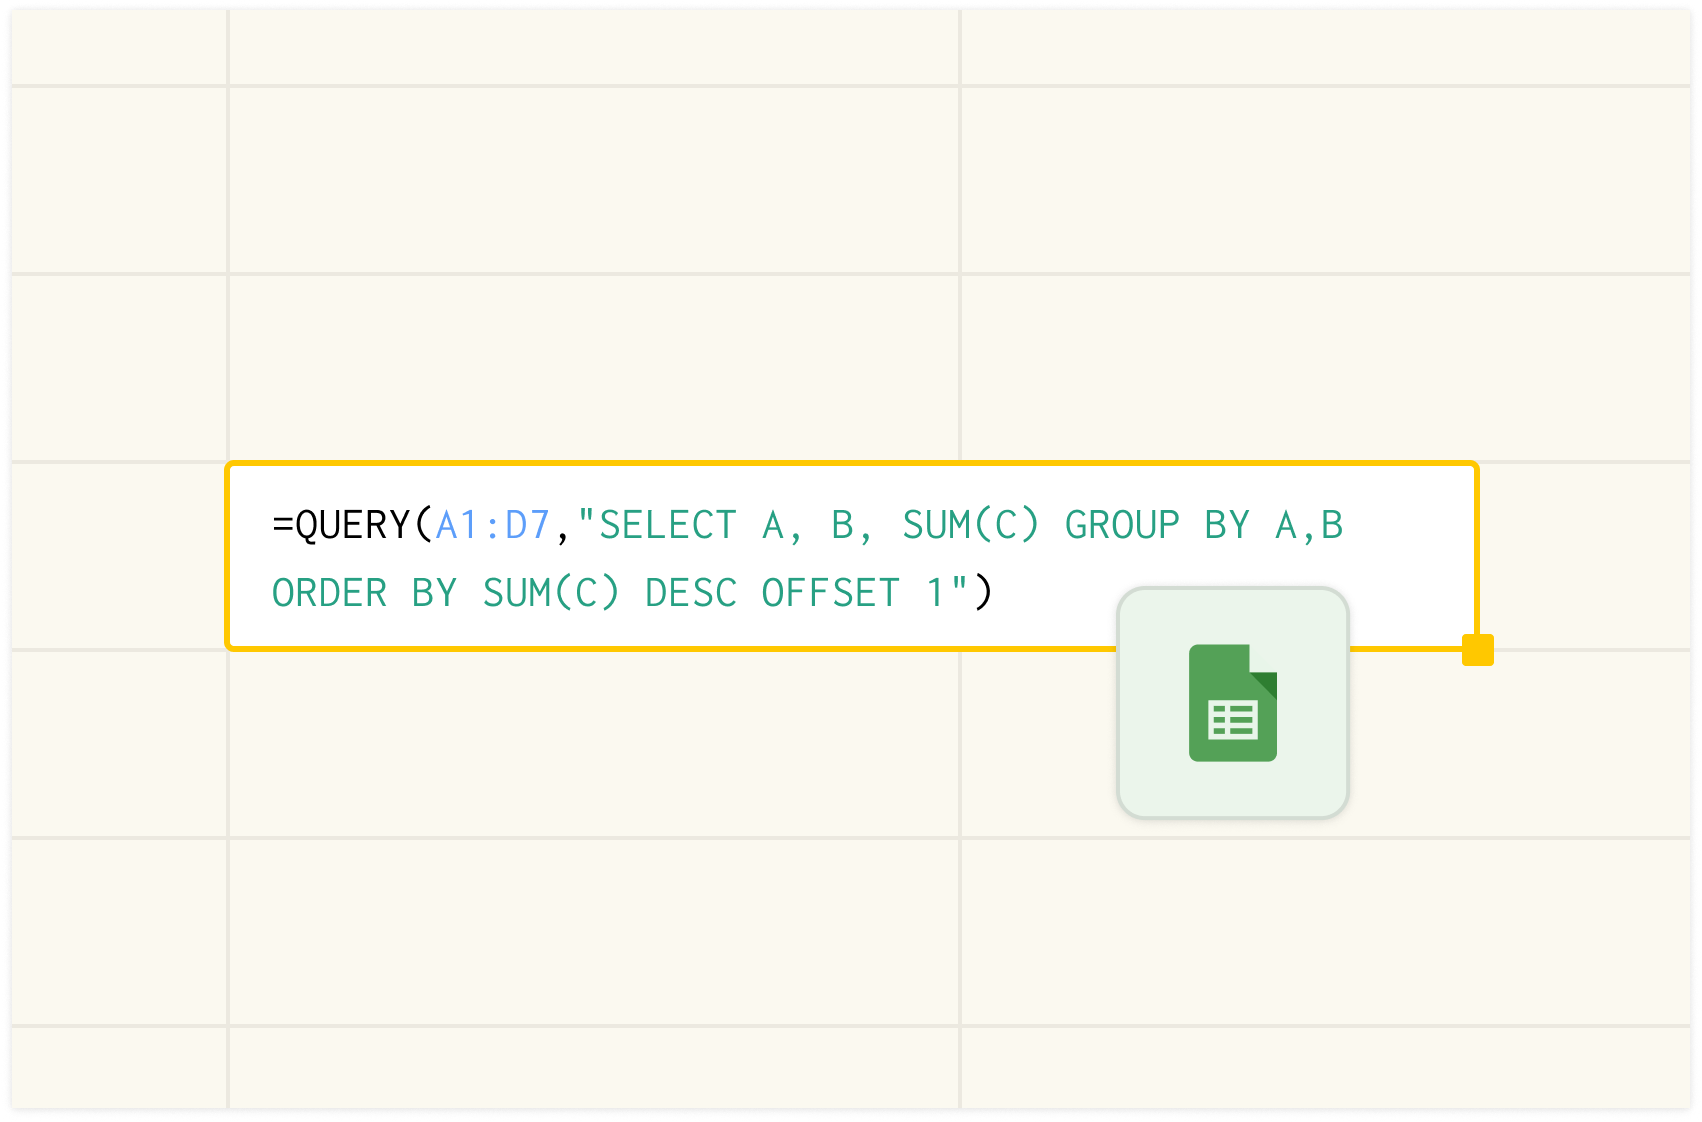
5. ORDER BY: ORDER BY is used in the QUERY function to sort the rows of a table based on the values in one or more columns.
It can be helpful when you want to present your query results in a specific order, alphabetically, by date, or by a custom order that you specify.
Ascending order is the default. You can also use the DESC keyword with the ORDER BY clause to specify that the rows should be sorted in descending order. e.g., to sort in reverse alphabetical order by the latest date or by the highest or lowest values in a column.
Example: =QUERY(A1:D7,"SELECT A, B, SUM(C) GROUP BY A, B ORDER BY sum(C) DESC")
6. LIMIT: LIMIT is used in the QUERY function to specify the maximum number of rows a query should return.
It can be useful when you have a large dataset and only want to display a limited number of rows in your query results. For example, you could use the LIMIT clause to display the top 10 most expensive items, the top 5 best-selling products, or the first 100 entries in a database.
For example, if we wanted to create a table that shows the cost of the most expensive three items, we could use the following QUERY function:
=QUERY(A1:D7,"SELECT A, B, SUM(C) GROUP BY A,B ORDER BY SUM(C) DESC LIMIT 3")
7. LABEL: The label is used to rename the headers of the columns in the QUERY function. Use the following syntax to rename a column:
Example: =QUERY(A1:D7,"SELECT * Label A 'Cat', B 'Type'")
This will label column A with Cat and column B with Type.
How Rows is different from Google Sheets’ QUERY function
The third argument (headers) of the three arguments — data, query, and headers — functions slightly differently in both languages.
Google Sheets
- If the argument is not specified, Google tries to identify the header row(s) automatically from the range argument; it can match one or more rows;
- If the argument is specified, then it will respect the nr of header rows;
Rows
- If the argument is not specified, no header rows are identified; Same as if the argument value=0;
- If the argument is specified, it will respect the number of header rows. There is an exception to this rule in Rows, which is when you use the pivot clause. This clause will automatically produce headers based on the columns it specifies
The spreadsheet where data comes to life
Connected to your business data. Powered by AI. Delightful to share.
Try Rows for FreeGet Started with Rows
To save time using the QUERY Function on your spreadsheets, opt for the modern, AI-powered alternative— Rows.com.
With Rows.com, you can easily manipulate your data using our built-in AI analyst. And, of course, we allow you to try querying manually with about 8 QUERY commands. You can also extract meaningful insights from your QUERY outputs.
Ready to get started with Rows.com? Sign up here for free