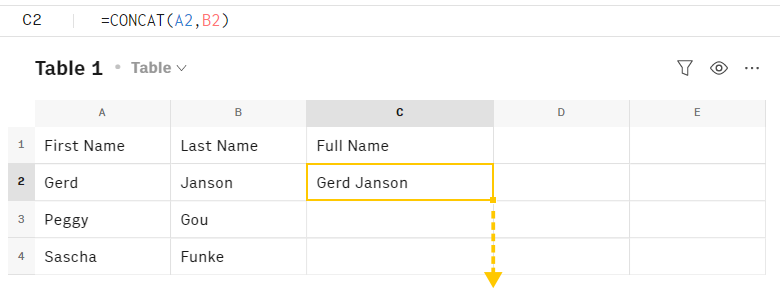
If you're using a formula next to a table of data, you want an easy way to have the same formula to all rows.
For example, in this illustration, we want to concatenate the first and last names, so we use the handle to drag down the cell C2 and have same forumula apply to rows 3 and 4 as well.
This is very simple case though. What if you have a table that dynamically updates, like a Data Table? You can't predict how far down you need to drag the formula cell.
You might have run into the same problem in other spreadsheet applications, when trying to apply formulas to the contents of an ever-changing pivot table.
Fortunately, Rows has an AUTOFILL function which solves this problem.
How the AUTOFILL function works
If you have a formula that applies to a column in a dynamic Data Table, you can wrap it in an AUTOFILL function so that it adapts to the number of rows in the table.
The following screenshot shows the AUTOFILL function in action.

What exactly is happening in this example?
- We've put a list of companies in a Data Table (red section) so that we can easily review the company names and domains.
- In the cell
C2, we then used theJOB_OPENINGS_PREDICTLEADSfunction to see how many open position each company has .- This function uses the company's domain as a query parameter — we get the domain from column
Bso the first cell we reference is "trendmicro.com" inB3. - We also use the
PARSEfunction to just get the metadata about the total number of open positions.
- This function uses the company's domain as a query parameter — we get the domain from column
- Finally, still in cell
C2, we then wrap the whole thing in anAUTOFILLfunction, so that the formula is automatically copied all the way down to the bottom of the table (yellow section).
Currently, the table has 10 entries so the AUTOFILL function has created 10 instances of the JOB_OPENINGS_PREDICTLEADS formula. However, the results of the company search could always change (especially if you allow users to enter their own search critieria in Live View).
In this case, the AUTOFILL function will always adapt to the length of the table and add or remove instances of whatever formula it encloses.
Try it Yourself
Using the AUTOFILL function
The easiest way to get started with the AUTOFILL function is through the function wizard.
To use the AUTOFILL function with the function wizard, follow these steps
- Select a cell adjacent to a column or table that contains several rows of data.
- Underneath this cell should be enough free space to insert copies of the formula.
- Click the Function Wizard
 button in the main toolbar.
 - In the search box, search for
AUTOFILLand click the result. In the options panel, configure the options for the
AUTOFILLfunction.Option Use To Label The header that you want to use for the column - Since this function is designed to add an extra column to a table, it's useful to define a table header as the first row.
Set formula Enter the formula that you want to be filled down to the bottom of the table. - For example,
FIND_EMAIL(A2, B2, C2) - Note that you can't reference a range such as
SUM(A2:B2)— you can only reference individual cells (for example,SUM(A2,B2)would work).
Set mode Choose how the cells should be automatically filled and enter the ID of the desired fill mode. - 0 The default option which only fills empty cells on the way down.
- 1 Overwrite and recompute cells only when the formula has changed.
- 2 Always overwrite and recompute all cells every time the table is changed.
Click Save Changes in Cell... to apply the
AUTOFILLformula.